Roofing
Roof Flashing Types: What Each One Does and Where It Goes
By Noah Spagnotti

Roof flashing is thin, corrosion-resistant sheet material that seals every place where your roof meets something else: a wall, a chimney, a vent pipe, a skylight, an edge or another roof plane. The main types are step, counter (continuous), base, valley, drip edge, kick-out, vent pipe, chimney and skylight flashing. Each one exists to solve a different water problem, and many roof leaks start at one of them rather than in the middle of a shingle field.
Below is a plain guide to each type, the materials they are made from, how open and closed valleys differ, and the installation mistakes that cause hidden rot. If you own a home in the Omaha area and suspect a flashing problem, the last sections tell you what to look for and what to ask a roofer.
TL;DR
Flashing is required wherever a roof plane meets a wall or is pierced by something. Per the asphalt roofing industry's residential manual, those spots need it for leak-free performance.
Step flashing goes along sloped roof-to-wall joints, one piece per shingle course. Counter flashing covers the top edge of other flashings. Kick-outs send water into the gutter.
Valleys can be open (exposed metal), closed-cut or woven. The right method depends on the shingle, so follow the shingle manufacturer's instructions.
Many flashing failures come from installation details, not from the metal: nailed flanges, missing kick-outs, and wall wrap lapped the wrong way.
Flashing can often be repaired on its own without replacing the roof.
Why flashing matters more than the shingles
Shingles shed water by overlapping. That works on an open slope, but it fails at every joint where the overlap pattern is interrupted. Flashing is the fix: it layers metal under and over the joint so gravity carries water down and out. The Building America flashing guide describes the principle as layering materials so water is directed downward and outward, notes that in general the sooner water is directed out the better, and calls flashings arguably the most important part of the building enclosure.
That is also why flashing problems can get expensive. Water that gets behind flashing often does not show up as a drip right away. It travels along framing and sheathing, and the first sign may be stained drywall or soft siding trim months later.
The main roof flashing types
Step flashing
Step flashing seals the joint where a sloped roof meets a vertical wall, such as a dormer side or a second-story wall above a porch roof. It is installed as individual L-shaped pieces, each woven between one course of shingles, not as one long strip. According to the ARMA residential manual, each piece is at least 10 inches long and at least 2 inches wider than the shingle exposure, so a 5-inch exposure calls for a piece at least 10 by 7 inches, bent to sit 5 inches on the roof and 5 inches up the wall. Each piece overlaps the one below by 2 inches and is nailed to the roof, not the wall.
Counter flashing (continuous flashing)
Counter flashing covers the top edge of another flashing so water cannot slip behind it. On a brick chimney it is usually tucked into a mortar joint and bent over the base flashing. Where siding runs down a wall, the ARMA manual says the siding should come down at least 2 inches over the vertical leg of the step flashing to serve as the counter flashing. The same manual says not to nail that vertical leg to the wall framing, because differential movement between the wall and roof will likely cause shingle buckling or sealant breakage.
Step flashing vs. counter flashing
They are partners, not alternatives. Step flashing is the lower layer that weaves into the shingles. Counter flashing is the upper layer that shields the step flashing's top edge. Think of them as a shingle pattern in metal: lower piece under the roof covering, upper piece lapped over it.
Base flashing
Base flashing is the lower flashing at a joint, which sits directly on the roof surface. Step flashing is one form of base flashing. On low-slope and flat roofs, base flashing is often a membrane or metal turned up the wall, and counter flashing is set over it.
Valley flashing
A valley is where two roof planes slope into each other and carry the combined runoff of both. It is one of the most heavily loaded spots on any roof. Valley flashing is a long, often W-shaped or V-shaped metal channel laid over underlayment, and it is covered in more detail in the next section. If you already have a valley leak, our guide to stopping repeat roof valley leaks explains the pro and safe DIY checks.
Drip edge
Drip edge is the L-shaped metal along eaves and rakes. It pushes water off the roof edge and away from the fascia and deck edge, and it keeps the first shingle course from sagging. Where it overlaps and how the underlayment layers at eaves versus rakes matter, and we cover that in our roof drip edge guide.
Kick-out flashing
Kick-out flashing, also called a diverter, is a small angled piece at the low end of a roof-to-wall joint. Without it, water running down the step flashing hits the end of the wall and pours behind the siding. The Building Science Education page on kick-outs says diverters should be installed at the eaves of all roof-wall intersections to divert runoff into the gutters. The Building America construction specifications say kick-out flashing shall be installed at the low end of roof/wall intersections to direct water away from walls, windows and doors below.
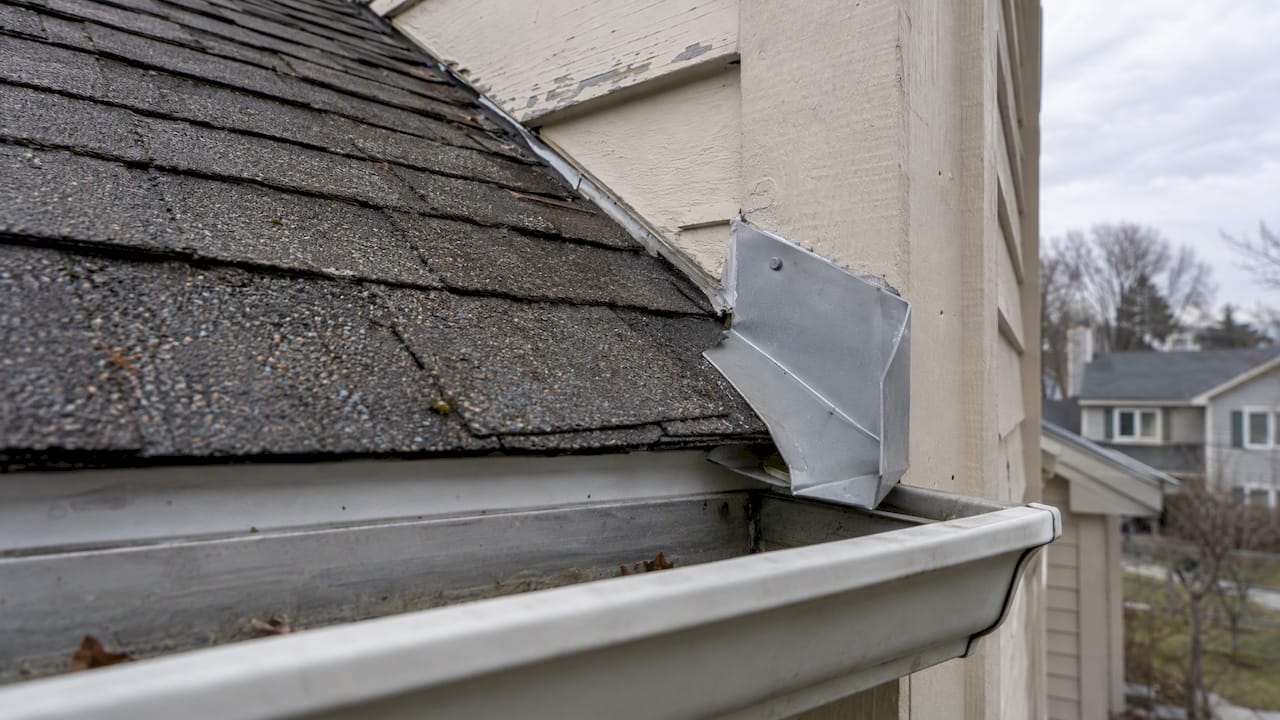
Quality matters. The same Building Science Education page says site-fabricated sheet metal kick-outs can be undersized and may have unsealed seams that allow leakage, and calls prefabricated seamless molded plastic or welded-seam metal kick-outs a better option. It also notes they must be sized right and integrated with the housewrap. Check your own kick-out when you clean gutters: it should be there, tight to the wall, and discharge into the gutter, not past it.
Vent pipe flashing
Plumbing vents pass through the roof, and each needs a flashing boot: a metal or plastic base with a rubber collar around the pipe. The rubber can crack with sun and age before the shingles wear out, and the ARMA residential manual recommends inspecting the flange once a year for cracks. Pipe boots are also among the easier flashings to replace on their own.
Chimney flashing
A chimney needs several flashings working together: step flashing along the sides, a base flashing at the front, a saddle (cricket) behind a wide chimney to split water, and counter flashing set into the masonry. Because it combines so many parts, it fails often. See our post on chimney flashing repair and the three fixes that stop repeat leaks.
Skylight flashing
Skylights use a kit or custom flashing that includes step-style pieces on the sides, a sill flashing at the bottom and a head flashing at the top. The pieces must overlap in the right order from bottom to top, so water always moves over the next piece and never under it. Skylight leaks are often blamed on the flashing when the cause is condensation or a failed seal, so test before you replace. Our low-pressure hose test for skylight leaks walks through how to isolate the source.
Gutter apron and eave flashing
A gutter apron is a strip of metal that extends from under the roof covering over the gutter's back edge, guiding water into the gutter and keeping it off the fascia. If your gutters are not draining well, also check slope; see how to check gutter slope.
Quick reference table
Flashing type | Where it goes | What it does |
|---|---|---|
Step | Sloped roof against a wall | Seals the joint course by course |
Counter | Over the top of base or step flashing | Blocks water behind the lower layer |
Base | Bottom layer at walls and chimneys | Carries water onto the roof surface |
Valley | Where two slopes meet | Channels heavy runoff |
Drip edge | Eaves and rakes | Throws water off the edge |
Kick-out | Low end of a roof-wall joint | Sends water into the gutter |
Vent pipe | Around roof penetrations | Seals pipes with a collar |
Chimney | All sides of a chimney | Combines step, base, saddle, counter |
Skylight | Around the frame | Overlaps from sill to head |
Open vs. closed valleys and metal valley flashing
There are three common ways to finish a valley: open, closed-cut and woven. In an open valley, a strip of metal stays visible down the center and the shingles are trimmed back on both sides. In a closed valley, the shingles cover the center line and the metal, if any, is hidden. In a woven valley, shingles from both planes interlace.
The ARMA Residential Asphalt Roofing Manual covers all three and says the choice is subject to the shingle manufacturer's printed recommendations. It lists woven or closed-cut valleys as the preferred treatment for strip shingles, and open valleys as preferred for heavy, very thick laminated shingles. For an open valley it recommends metal at least 24 inches wide over a 36-inch-wide self-adhering underlayment (or an extra layer of heavy felt). Always follow the instructions for the specific shingle on your roof, since manufacturers differ on what they permit.
Open metal valleys have a few practical advantages:
Water runs on smooth metal, not abrasive granules, so heavy rain and snowmelt move quickly.
You can inspect the metal from the ground or a ladder with binoculars.
The tradeoff is looks: some homeowners prefer the continuous shingle line of a closed valley. If your roof has long valleys that carry a lot of water, ask your roofer whether an open metal valley is allowed with your shingle. A ribbed center (a raised rib down the middle) helps stop fast water from overshooting onto the opposite slope.
Roof flashing materials
The asphalt roofing industry's shingle application guidance gives minimum specs for metal flashing on residential asphalt roofs: 26-gauge G-90 galvanized steel, 16 oz. copper or 0.025-inch aluminum. Local code and the shingle manufacturer may require more, so check with the City of Omaha Permits & Inspections. Here is how the common choices compare in practice.
Material | Strengths | Watch for |
|---|---|---|
Galvanized steel | Strong, affordable, easy to form | Rust where the coating is scratched or cut |
Aluminum | Light, does not rust, easy to bend | Corrodes in contact with wet masonry or concrete; dents easily |
Copper | Very long life, develops a patina | Cost; it can stain other materials below it |
Lead-coated or specialty metals | Long-lasting, very malleable | Cost, availability |
Rubber or butyl | Flexible, good for odd shapes | UV wear if exposed |
Plastic (boots, kick-outs) | Seamless molded shapes | Cracking from sun if low quality |
Two rules matter more than which metal you pick. First, do not mix dissimilar metals in direct contact, since this can cause galvanic corrosion. Second, match the flashing's lifespan to the roof. Putting a short-lived pipe boot under a new roof that should last decades just sets up an early repair. For shingle choices that pair with your flashing, see our guide to roofing shingle types.
Where flashing goes wrong
Many flashing problems trace to installation details, not material failure. These are the main ones.
Missing or weak kick-outs. Water drains behind siding and rot builds unseen.
Wall wrap lapped the wrong way. The Building America water management guide notes the wall drainage plane must lap over the top of the step flashing, not behind it, so water exits onto the roof instead of into the wall.
Nailing the vertical leg. As noted above, it should float behind the siding.
Step flashing alone on veneer walls. The same guide warns that older step-flashing methods can fail on modern brick or stone veneer, where a through-wall flashing is also needed to send water that gets behind the veneer back onto the roof.
Caulk as the fix. Sealant on top of failed flashing is a short-term patch. It does not replace the overlap that makes flashing work.
Reusing old flashing under new shingles. Corroded or bent pieces get buried and fail early.
In cold climates like Nebraska's, ice dams add another layer of risk at eaves and valleys. The ARMA residential manual on ice dam protection explains that ice dams form when snow thaws over warmer parts of the roof and refreezes at the cold eave, and it recommends self-adhering underlayment along eaves and in valleys to resist water backing up from ice dams. That is why eave protection and tight flashing details matter.
Our perspective: flashing is where a roof is won or lost
When we inspect a roof, we look at the flashing early, before we talk about shingle brand or color. A good shingle over poor flashing is a leak waiting for the next heavy storm. Our approach is the one we apply to every job: detailed planning, clear communication and organized project management, so you know what is being done at each joint and why.
In practice that means we walk the roof-to-wall lines, chimney, valleys, penetrations and eaves, and we tell you what we see in plain terms. If a failed pipe boot or a stretch of step flashing is the whole problem, a targeted repair is often the sensible answer. The asphalt roofing industry's technical bulletin on repairability makes the same point: a knowledgeable contractor can make small repairs in a short period without disturbing large sections of the roof. When the roof is near the end of its life and flashing is failing in several places, replacement can make more sense, and our post on roof repair versus replacement lays out how we think about that choice.
One more habit: we want the siding, gutters and roof to work as one water system. Kick-outs, gutter aprons and wall cladding laps involve all three trades, and that is where one general contractor coordinating the work can keep the details from falling between trades.
How to check your flashing from the ground and attic
You do not need to climb on the roof. Staying on the ground and in the attic is safer and shows most warning signs.
From the ground, with binoculars: look for lifted, rusted or bent metal at chimneys, walls and valleys; missing kick-outs at the bottom of roof-wall joints; dried, cracked or split rubber around vent pipes; gaps along drip edge.
On the siding: look for staining, peeling paint or soft trim below where a roof meets a wall.
In the attic, with a flashlight: look for water stains or dark rings around chimneys, vent pipes and valleys on the underside of the deck, especially after rain or snowmelt.
After storms: hail and wind can bend or dislodge metal. Our 15-minute hail check helps you spot and document damage after a storm.
If water is actively coming in, move belongings out of the way, catch the water, and call a roofer. Do not walk a wet, icy or steep roof yourself.
What flashing work costs with us in Omaha
Flashing repair is usually part of a roof repair visit. These are the starting prices on our roofing page:
Roof leak assessment: $195. An on-site evaluation of one reported roof-leak concern, credited toward an approved roofing repair of $595 or more when scheduled within 30 days. This is the right starting point when you know water is getting in but not where.
Small roof repair: $595 and up per repair visit, for one straightforward localized concern.
Standard roof repair: $995 and up, for larger repair areas, multiple affected components, flashing work or more involved leak diagnosis.
Roof replacement: standard architectural shingles $5.50 per sq. ft. and up, Class 3 impact-resistant $6.00 and up, Class 4 SBS-modified $6.50 and up, with a $7,500 minimum. Pricing is based on measured roof area.
Chimney or wall flashing, valleys, skylights, steep or high roofs and concealed damage can raise the final price.
If the leak traces back to the wall, siding repair and gutter work often go hand in hand with flashing fixes. See our siding and gutter pages for what we handle. To have us look at your roof, start with our roofing services page linked above.
What to ask a roofer about flashing
A short list of questions separates careful contractors from careless ones:
Will you replace the flashing, or reuse the old pieces?
Is step flashing installed one piece per course, with the vertical leg left unfastened to the wall?
Will each roof-to-wall joint get a kick-out, and what type?
Which valley method will you use, and what is under it?
How are chimneys and skylights counter-flashed?
Are your crews licensed and insured, and who is my point of contact during the job?
A contractor who answers these without hesitation has probably done the work right many times.
FAQ
What are the most common types of roof flashing?
Step flashing, counter flashing, valley flashing, drip edge, vent pipe flashing, chimney flashing, skylight flashing and kick-out flashing cover most homes. Which ones you have depends on your roof's shape. A simple gable roof may only have drip edge, pipe boots and valleys, while a roof with dormers and a chimney uses nearly all of them.
Can I fix flashing with roofing cement or caulk?
Sealant can slow a small leak for a short time, but it is not a lasting repair, because flashing works by overlap, not by adhesive. Caulk dries, cracks and pulls away as materials move. If metal is bent, rusted or missing, have a roofer replace or re-lap it.
How long does roof flashing last?
It depends on the material, exposure and installation quality. Rubber collars on vent pipes often wear out before shingles do, while copper and well-installed galvanized or aluminum pieces can last much longer. An inspection after major storms and every few years catches problems early.
Is an open valley better than a closed valley?
It depends on the shingle. ARMA's manual lists open valleys as preferred for heavy, very thick laminated shingles and woven or closed-cut valleys for strip shingles. In an open valley water runs on smooth metal; a closed valley gives a cleaner shingle line. Ask your roofer which method your shingle manufacturer allows.
Do I need new flashing with a new roof?
In most cases, yes. Replacing flashing while the old roof is off is far simpler than tearing off new shingles later to fix a failed old piece, and reused corroded or bent metal can lead to early leaks.
Sources
ARMA technical bulletin: asphalt shingle roofs are repairable
Building America: water management in residential construction
Building Science Education: kick-out flashing at roof-wall intersections
Recommended
Dealing With Something Similar?
Every property is different, but if this sounds like what you’re seeing, we’re happy to take a look and help you figure out what’s actually going on.