Roofing
Homeowners: Stop Repeat Roof Valley Leaks with Safe DIY and Pro Fixes
By Noah Spagnotti

If water stains line up with the angled seam where two roof planes meet, the valley's flashing or underlayment has likely failed. Debris buildup or an ice dam can also be the culprit. A temporary patch can slow the water for a few months, but a lasting fix usually means pulling the shingles and replacing the underlayment and flashing underneath, so confirm the source first, then decide between a quick stopgap and a scheduled repair.
TL;DR:
Temporary patches on open valleys typically last between six to eighteen months before requiring professional repair.
A full repair involves replacing underlayment, installing new flashing, and inspecting decking for damage, with costs ranging from $300 to over $3,200 depending on extent.
Regular inspections twice a year and after storms can prevent leaks by removing debris, ensuring gutters drain properly, and sealing attic leaks.
Valleys are the most leak-prone roof detail because they funnel runoff into a lower-slope area, making them vulnerable to debris, corrosion, and ice dam issues.
DIY repairs are limited to surface patches for open valleys and are not suitable for hidden-flashings in closed-cut or woven valleys, which require professional attention.
How do you confirm the leak is coming from the valley?
Water travels before it shows up as a stain, so the ceiling mark rarely sits directly below the actual leak. Start by tracing that stain back to its highest point of origin rather than assuming it's dripping straight down.
Go into the attic during daylight with a flashlight and follow the valley line from the ridge down, checking sheathing and insulation for dark spots or dampness.
Look for a trail: water often runs along a rafter or the underside of the decking before dropping, so the wet insulation may sit several feet from the ceiling stain below.
From a stable ladder positioned at the eave, inspect the valley from a safe distance for rusted metal, holes, lifted shingle edges, or trapped leaves and grit. Do not step into the valley itself, since the metal or shingle surface there is often slick and can hide soft decking.
If the source is still unclear and it's safe to do so, run a garden hose over one section of the valley at a time, starting low and working upslope, while someone watches the attic for the first sign of water.
Not every leak near a valley starts there. Backed-up gutters, wall step flashing, and roof penetrations like vent pipes or chimneys sit close enough to valleys to mimic the same stain pattern, so rule those out before you commit to a valley repair.
Why valleys leak and how the type of valley changes the failure
A valley is where two roof planes drain into one channel, and that convergence is the problem. Two slopes worth of runoff funnel into a strip that also happens to have a lower effective slope than the surrounding roof, which means water moves slower and sits longer right where it's most concentrated. Valleys channel runoff from two planes and carry a lower effective slope than the surrounding roof, and that combination, worsened by debris and freeze-thaw cycles, makes valleys the roof's most leak-prone detail.
The specific failure usually traces to one of a handful of causes:
Missing or degraded ice-and-water shield under the valley, leaving bare decking exposed to backed-up water.
Corroded or perforated valley metal, common after years of freeze-thaw cycling.
Shingle corners that were never clipped or sealed, letting wind-driven rain wick sideways under the shingle edge.
Nails driven too close to the valley center, which puncture the underlayment and create a direct entry point.
Leaves, needles, and grit trapping water against the deck instead of letting it drain.
Ice dams that back meltwater up under otherwise sound shingles.
Valley construction style also shapes how it fails. Open valleys expose a metal channel, so the risk is corrosion, denting, or debris damming the metal. Closed-cut valleys hide the flashing under shingles from one slope, so a failure is invisible until water is already inside, and the hidden underlayment does the real work. Woven valleys interlace shingles from both slopes with no metal at all, which means the shingle overlap itself is the only barrier, and any lifted tab can wick water straight through.
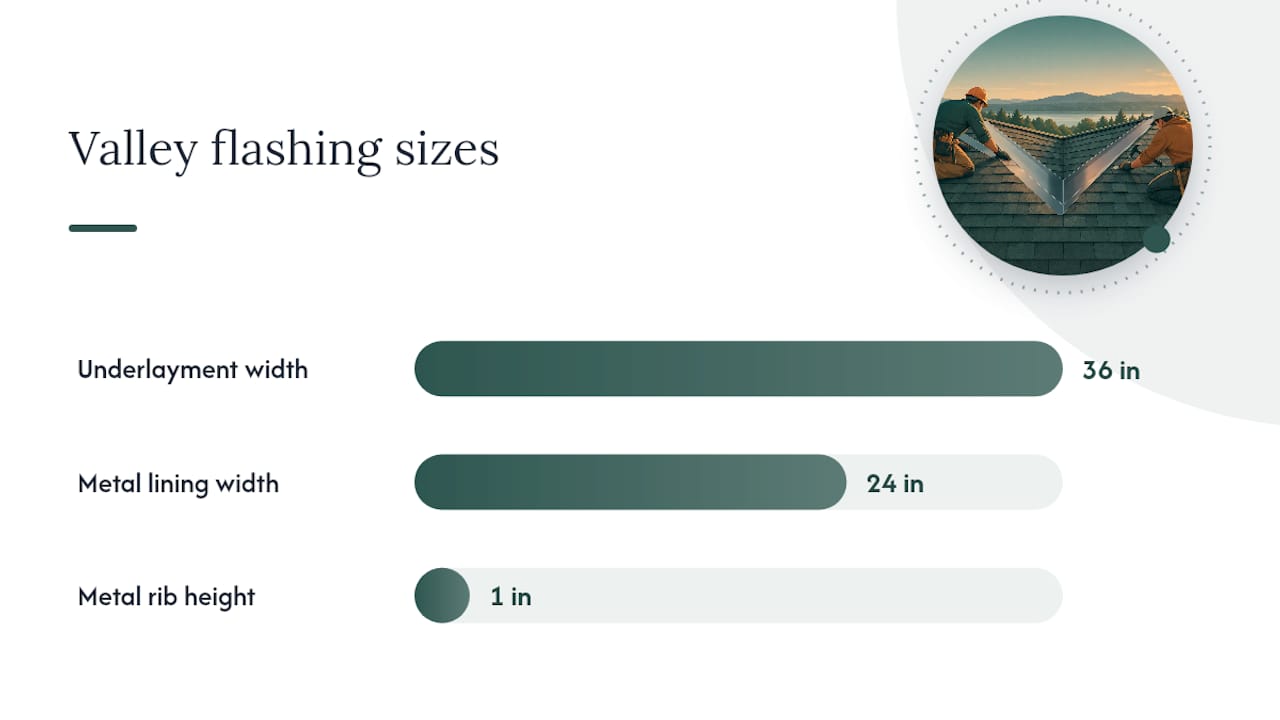
NRCA recommends a full-width, polymer-modified bitumen or self-adhering underlayment centered in the valley, at least 36 inches wide, with metal valley linings formed with a center rib at least 1 inch high and 24 inches wide where metal is used. That specification exists because a narrow strip of underlayment simply cannot handle the water volume a valley sees during a heavy storm.
Temporary fixes you can try safely, and where DIY stops working
A temporary patch buys time. It does not solve the underlying problem, and knowing that distinction keeps you from assuming a quiet roof means a fixed one.
Safety comes first. Only get on a roof in dry conditions, wear shoes with soft rubber soles, use a properly footed extension ladder, and never step into the valley channel itself, since that's exactly where soft or rotted decking is most likely to give way.
Clear debris from a ladder or with a leaf blower rather than walking the roof surface, and remove snow or ice by hand or with a roof rake instead of chipping at it, which can gouge shingles or metal.
For an open metal valley with a small hole, clean the area, apply roofing cement, and press a matching metal patch or self-adhesive membrane over the spot.
Check the patch after the next few rain events and expect it to hold for roughly six to eighteen months before the seal degrades or shifts.
Pro tip: Mark the patch location with chalk or a photo so you can find it again quickly if it starts leaking during the next storm.
Closed-cut and woven valleys are a different problem entirely. Their flashing sits underneath shingles from both roof planes, so reaching it means removing shingles on both sides of the valley, not just lifting one edge. That's beyond a surface patch and is where most DIY attempts either fail outright or accidentally create a new leak path. DIY temporary sealing typically runs $75 to $200, which makes sense for a quick stopgap on an open valley, but treat it as exactly that: a stopgap, not a repair.
What a durable valley repair actually involves
A lasting fix resets the whole assembly rather than patching the surface. A professional starts by removing shingles on both slopes around the valley, then probes the exposed decking for soft spots or rot, since any water that reached the deck has likely started to degrade it. Damaged sections of decking get cut out and replaced before anything else happens.
The rebuild sequence itself follows a consistent order:
Install a full-width ice-and-water shield centered in the valley, extending well up both slopes.
Form and install new valley flashing to the correct profile, whether open metal or a hidden flashing detail for a closed-cut valley.
Re-shingle both slopes, keeping fasteners well outside the valley centerline so no new nail punctures the underlayment.
Confirm terminations at the ridge and eave direct water into the valley cleanly rather than trapping it partway down.
Material choice for the flashing matters more than most homeowners expect. Aluminum is affordable and easy to form but can corrode faster in coastal or high-moisture areas. Galvanized steel holds up longer against general weathering but will eventually rust at cut edges. Copper costs more upfront and resists corrosion for decades, which is why it shows up on higher-end or historic roofs where longevity matters more than initial price.
NRCA's guidelines call for underlayment at least 36 inches wide, centered on the valley, with metal linings that include a raised center rib to keep water from crossing from one slope's runoff into the other. In snow country, the National Weather Service recommends the self-sealing membrane extend high enough up the slope to resist 6 to 8 inches of standing water above the wall's insulation line, since that's roughly how deep meltwater can pool behind an ice dam before it finds a way in.
Professional valley flashing replacement typically runs $300 to $3,200 depending on decking damage, valley length, and flashing material, a wide range that reflects how much scope varies once the shingles come off.
A full roof replacement becomes the more sensible option when the roof is already near the end of its service life, when more than one valley is failing at once, or when decking rot extends well beyond the valley itself. Our roof repair versus replacement guide walks through how to weigh that decision against your roof's age and condition.
Preventing the next valley leak before it starts
Most valley failures are preventable with a maintenance rhythm most homeowners never establish. Two inspections a year, one in spring and one in fall, plus a check after any major storm, catches small problems while they're still small.
Clear leaves, needles, and branches from valleys and gutters, since debris traps moisture and blocks drainage exactly where the roof needs it most, and inspecting valleys at least twice a year cuts that risk significantly.
Check that gutters and downspouts are draining freely, since a clogged gutter backs water up toward the eave and valley alike. Our downspout drainage guide covers how to fix chronic backup.
Seal attic air leaks and add insulation where it's thin, since warm air escaping into the attic is a major driver of the uneven roof temperatures that create ice dams. The Department of Energy's guide to durable attics covers air sealing, insulation depth, and baffle placement in detail.
Confirm soffit-to-ridge ventilation is continuous and unobstructed, since balanced airflow keeps the whole deck at a consistent temperature instead of melting snow unevenly. Our roof ventilation guide explains the ventilation types and the one mistake that undoes them.
Ask your roofer whether your climate and roof slope call for a wider underlayment or a different valley type at your next re-roof.
Homeowners in colder regions who deal with repeat ice buildup may also want to read our ice dam prevention guide, which covers the mechanics in more depth.
When to hire a roofer and what a professional repair covers
Some situations call for a professional immediately rather than a wait-and-see patch.
The leak is active during a storm and water is visibly entering the living space.
The decking feels soft or springy when checked from the attic side.
The valley metal shows rust-through rather than surface corrosion.
The valley is a closed-cut or woven style, since accessing the flashing means removing shingles on both slopes.
Roof access itself is unsafe due to steep pitch, height, or wet conditions.
A proper inspection includes probing the decking for hidden rot, verifying the underlayment laps correctly under the flashing, checking how the flashing terminates at the ridge and eave, and confirming where discharge actually routes once it reaches the gutter.
When comparing bids, ask each contractor how much decking replacement they expect, what underlayment and flashing materials they plan to use, what warranty covers the work, whether they'll document any hidden damage they find before repairing it, and how cleanup and disposal are handled. A written estimate should spell out scope, materials, and a realistic timeline, not just a lump-sum number.
Balancing DIY action with a professional rebuild
A safe, temporary patch is worth doing while you wait, but it's a delay tactic, not a solution. Valleys handle more water than any other part of the roof, and a single-point patch on that kind of flow tends to fail again within a season or two. The homeowners who avoid repeat calls are the ones who treat the temporary fix as exactly that: a bridge to a scheduled, documented rebuild rather than a substitute for one.
— Noah
How Spagnotti Contracting handles valley leaks
If you'd rather have a professional confirm the diagnosis than trace stains through the attic yourself, Spagnotti Contracting offers a Roof Leak Assessment for $195 that pinpoints the source before any work begins.
From there, the scope depends on what we find. A contained valley issue typically falls under our Roof Repair service, priced from $595 to $995 per visit, while more extensive decking damage or multiple failing valleys may point toward a full Roof Replacement at $5.50 to $6.50 per square foot. Every job includes a documented inspection, a written estimate before work starts, scheduled crews, and full cleanup. If your valley has been patched more than once already, schedule an assessment and get a clear answer on what it actually needs.
Sources
FAQ
How do I know if my roof leak is coming from the valley?
Trace ceiling stains back to their highest point in the attic, following the valley line for damp sheathing or wet insulation. If the trail leads to the angled seam where two roof planes meet, along with visible rust, gaps, or debris from a ladder inspection, the valley is the likely source.
Can I fix a roof valley leak myself?
You can safely clear debris, remove ice with a roof rake, and patch a small hole in an open metal valley with roof cement and a matching patch, which typically costs $75 to $200. Closed-cut and woven valleys hide their flashing under shingles on both slopes, so those require professional repair rather than a surface patch.
How long does a temporary roof valley patch last?
A well-applied temporary patch on an open valley generally holds for six to eighteen months before it needs revisiting. It's a stopgap meant to protect the home until a full underlayment and flashing replacement can be scheduled.
Why do roof valleys leak more than other parts of the roof?
Valleys collect runoff from two roof planes at once and have a lower effective slope than the surrounding roof, so water moves slower and sits longer exactly where it's most concentrated. Debris buildup and freeze-thaw cycling on aging flashing add to that risk, which is why valleys are considered the most leak-prone detail on a roof.
Recommended
Dealing With Something Similar?
Every property is different, but if this sounds like what you’re seeing, we’re happy to take a look and help you figure out what’s actually going on.