Roofing
Chimney Flashing Repair: 3 Fixes Homeowners Need to Stop Repeat Leaks
By Noah Spagnotti

Most chimney flashing problems fall into one of three fixes: a reseal for small gaps, a partial repair for corroded step flashing, or a full replacement when counterflashing is missing or badly lapped. Homeowners should expect a range from a few hundred dollars for a reseal to several thousand for full replacement with a cricket. If you see active water intrusion, patch temporarily and call a professional contractor before the next rain.
TL;DR:
Replacing missing or badly lapped counterflashing or installing a cricket are essential for preventing recurring leaks on wide chimneys.
Costs range from a few hundred dollars for reseals to several thousand for full replacements with masonry work and crickets, depending on materials and chimney size.
In climates with freeze-thaw cycles, copper and aluminum offer better longevity, but material choice influences total cost and durability.
Consumer inspections should focus on water stains, rust streaks, and gaps outside, and attic dampness or stains inside, but avoid climbing onto steep or wet roofs.
Proper flashing repair involves careful inspection, correct installation sequence, and clear documentation, with photography recommended to verify quality.
What Chimney Flashing Is and the Materials You'll See
Chimney flashing is the system of metal pieces that seals the joint between the roof and the chimney. Step flashing runs up the sides in overlapping L-shaped pieces, one per shingle course. Counterflashing covers the top edge of the step flashing and is set into the masonry, either mortared into a reglet or cut into the joint. The apron, or front piece, spans the downslope side, while the backpan handles the upslope side behind the chimney. On wider chimneys, a cricket, a small peaked structure, diverts water and debris around the back.
Material choice affects both lifespan and price:
Galvanized steel is affordable and common but can rust within 15 to 20 years in wet climates.
Aluminum resists rust but corrodes near masonry with high acid content and can be less durable long-term.
Copper lasts 50 years or more and develops a protective patina, at a higher upfront cost.
Lead is still used in some older installations but is less common in new work due to handling concerns.
EPDM and rubberized flashing boots work well for round pipes but aren't a substitute for metal step flashing on a masonry chimney.
For most climates with freeze-thaw cycles, galvanized steel or aluminum offers a reasonable balance of cost and durability, while copper pays off on homes where the owner plans to stay long enough to see the difference.
How to Spot Flashing Failure Before It Becomes a Bigger Problem
Flashing failure usually shows up in two places: inside the attic and outside on the roof. Indoors, look for water stains on ceilings near the chimney, damp insulation, or a musty smell in the attic that gets worse right after a storm. Outside, check for rust streaks below the flashing, gaps where step flashing has lifted from the shingles, cracked or crumbling mortar around the counterflashing reglet, and dried or cracked sealant beads.
A simple homeowner checklist before calling a contractor:
Check the attic for stains or damp wood within a day or two of heavy rain.
Photograph the chimney from the ground or a second-story window using a zoom lens.
Note whether leaks appear only during wind-driven rain, which often points to a lapping problem rather than a simple gap.
Check gutters and downspouts near the chimney for granule buildup, which can signal shingle wear around the flashing.
Avoid climbing onto a steep or wet roof to inspect flashing yourself. NRCA safety and inspection guidance recommends photographic surveys from a ladder or the ground over walking a roof that's steep, wet, or icy.
Pro Tip: Take photos right after a rainstorm, not days later. Water stains that are still slightly damp help a contractor trace the leak path more accurately.
What Chimney Flashing Repair Costs and What Drives the Price
Costs vary by scope. A simple reseal or caulk touch-up on a small gap tends to sit at the low end, while a full flashing replacement with new counterflashing and a cricket lands at the high end. Reseal and patch jobs typically land in the low hundreds of dollars, while full replacements often run from several hundred to a couple thousand dollars depending on materials and complexity. Exact numbers vary by chimney size, access, and masonry condition, so treat any online range as planning context until you have a site-specific written estimate.
Several factors move a quote up or down:
Material choice: copper costs more upfront than galvanized steel but needs less frequent replacement.
Chimney width and roof pitch: wider chimneys and steeper roofs require more material and more time on rigging and safety equipment.
Masonry condition: if the reglet or chimney chase needs repointing or rebuilding, that's a separate line item.
Permits: some municipalities require a permit for flashing or roofing work tied to chimney modifications, which adds a fee.
Disposal: removing old flashing and any damaged decking adds a haul-away cost.
When comparing quotes, insist on an itemized breakdown of materials and labor, and a clear note on whether masonry repointing is priced separately from the flashing work itself. A quote that lumps everything into one number is harder to compare and harder to hold a contractor accountable to later.
Which Flashing Fixes You Can Try Yourself and Which Need a Pro
Some flashing issues are manageable for a comfortable DIYer working from a ladder on a low-slope, dry roof. Others carry real risk of injury or a bigger repair bill if done wrong.
Reasonable DIY tasks: applying fresh roofing sealant over a small, accessible gap, or replacing a cracked bead of caulk around counterflashing.
Tasks that need a professional: full step flashing replacement, counterflashing reglet work, any repair on a steep or high roof, and anything involving structural masonry.
A safer alternative to climbing: take zoomed-in photos from the ground or a second-story window and send them to a contractor for a remote assessment first.
NRCA safety guidance generally favors this photo-first approach over roof walking, especially on steep or wet surfaces. Poor DIY flashing work tends to create repeat leaks, damaged shingles around the patch, and sometimes water intrusion into masonry that gets more expensive to fix the longer it's ignored. If you're already weighing a bigger roof project, this roof repair versus replacement guide walks through how flashing issues can factor into that decision.
What a Proper Flashing Repair or Replacement Looks Like
A competent contractor follows a consistent sequence, and knowing it helps you verify the work once it's done.
Inspect and document. The contractor photographs the roof and attic, measures the chimney's width and height, and checks for related damage to shingles or decking.
Stop active leaks temporarily. If it's actively leaking and full repair has to wait, a pro may apply a temporary sealant patch or tarp to buy time. For an active leak right now, these emergency roof leak steps cover what to do while you wait for a scheduled repair.
Remove and prep. Old flashing comes off, mortar joints or the reglet get cleaned or repointed, and the roof deck underneath is checked for rot before new material goes on.
Install new flashing. Step flashing is lapped correctly with each piece overlapping the one below it, counterflashing is set into a cleaned reglet or through-wall detail, and the apron and backpan are fitted and sealed. NRCA's flashing guidance warns that saw-cut counterflashing is often decorative unless detailed correctly, so ask specifically how the counterflashing is anchored.
Integrate a cricket if needed. On wider chimneys, the cricket gets framed and tied into the new flashing system rather than added as an afterthought.
Final check and cleanup. A thorough contractor checks the attic again after the first rain following the repair, confirms the agreed scope in writing, and removes debris from the site.
Pro Tip: Ask your contractor to send a photo of the completed counterflashing before they leave. It's the detail most likely to fail if rushed, and a photo gives you a record if problems show up later.
When a Cricket or Extra Drainage Work Is the Only Real Fix
A cricket is a small peaked structure built behind a chimney to divert water, snow, and debris around it instead of letting it pool against the flashing. NRCA guidance recommends a cricket on the upslope side of chimneys wider than roughly 24 to 30 inches.
Without a cricket, water and debris build up against the upslope flashing and force their way under laps during heavy rain or snowmelt.
Standard step and counterflashing alone can't handle that volume on a wide chimney, no matter how well they're installed.
A cricket substrate needs to be framed and decked with wood to properly support the shingle or metal skin over it, per NRCA guidance.
Adding a cricket increases the scope and cost of a repair, but it's often the only way to stop the leak from returning year after year.
Exactly What to Ask a Contractor Before You Sign
Getting the right questions answered upfront saves you from surprises mid-project or a leak that returns in a year.
Ask which materials they plan to use and why, and whether it's step flashing, continuous flashing, or both.
Ask how the counterflashing will be anchored, since a poorly cut reglet is a common source of repeat leaks.
Ask directly whether a cricket is included if your chimney is wide enough to need one.
Ask to see proof of insurance, and where applicable, a business license.
Ask for photos of past flashing work so you can see how they detail counterflashing and cricket transitions.
Ask about a lien waiver on final payment, which protects you if a subcontractor wasn't paid.
Get the agreed scope and schedule in writing before work starts. A contractor pre-job checklist built for another type of project shows the kind of documentation habits worth expecting across any home repair job.
Pro Tip: A contractor who hesitates to itemize materials and labor separately is a sign to keep shopping quotes.
Spagnotti Contracting's Approach to Roof Leak and Flashing Work
A residential roofing contractor handles roof repair and roof leak assessments as part of their services in the Omaha metro area. The approach centers on detailed planning and clear communication, with trained crews managing the work from initial consultation through final walkthrough. For flashing-related leaks specifically, this means a documented inspection, a written scope before any work begins, and consistent updates as the repair progresses. Clients get a clear picture of what's being replaced and why, rather than a vague line item on an invoice.
Safety Precautions to Take During a Flashing Repair
Flashing repair involves working at height on a sloped surface, which carries real fall risk even for experienced crews. Contractors typically use roof harnesses, secure ladder placement, and toe boards on steeper pitches, and they avoid working during rain, high wind, or icy conditions.
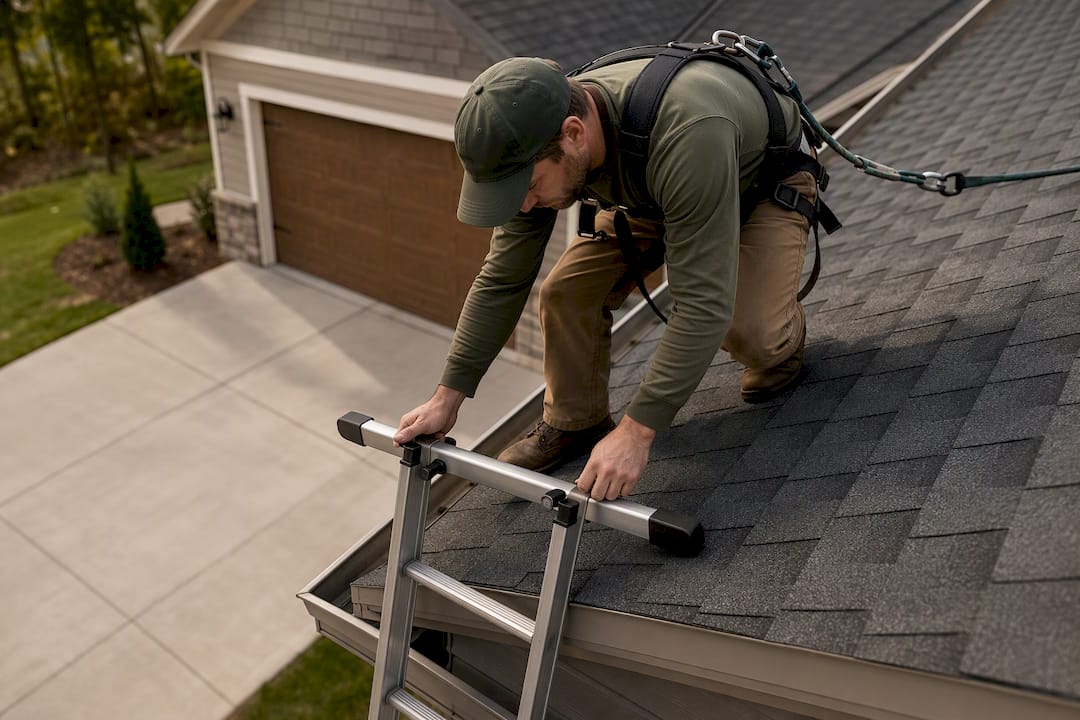
For homeowners, the main safety precaution is staying off the roof entirely and letting a professional handle the physical work. If you must inspect from a ladder, keep three points of contact, avoid leaning out to see around the chimney, and never carry tools or a phone in a way that blocks a free hand on the rails. Watch for loose or cracked shingles near the work area after a repair, since foot traffic during the job can stress older roofing material even when the crew is careful.
Masonry work around the chimney adds its own risk if mortar or brick has already deteriorated. A contractor should flag any chimney structural concerns before starting flashing work, since a repair sequenced in the wrong order can leave a chimney less stable temporarily. If your chimney shows visible leaning, wide cracks, or missing brick, that's a separate structural conversation before flashing gets touched.
How Weather Affects Repair Timing and How Long the Fix Lasts
Flashing repairs need dry conditions to cure sealants properly and to let a contractor safely access the roof. Most contractors avoid scheduling flashing work during freezing temperatures, since sealants don't bond well in the cold, or during active precipitation, which makes the roof surface unsafe.
Seasonal timing also affects longevity. A repair done in late fall right before winter has less time to cure before facing freeze-thaw cycles, which can stress fresh sealant and mortar joints. Spring and early fall tend to offer the most reliable stretch of dry, moderate-temperature days for this kind of work.
Beyond the repair itself, ongoing weather exposure determines how long the fix holds. Heavy snow load and ice damming put repeated stress on flashing laps and counterflashing seals, particularly on the upslope side of a chimney without a cricket. Homes in climates with frequent freeze-thaw cycles tend to see flashing sealant and mortar joints degrade faster than in milder, drier climates, which is part of why material choice matters as much as installation quality.
How Long a Chimney Flashing Repair Actually Takes
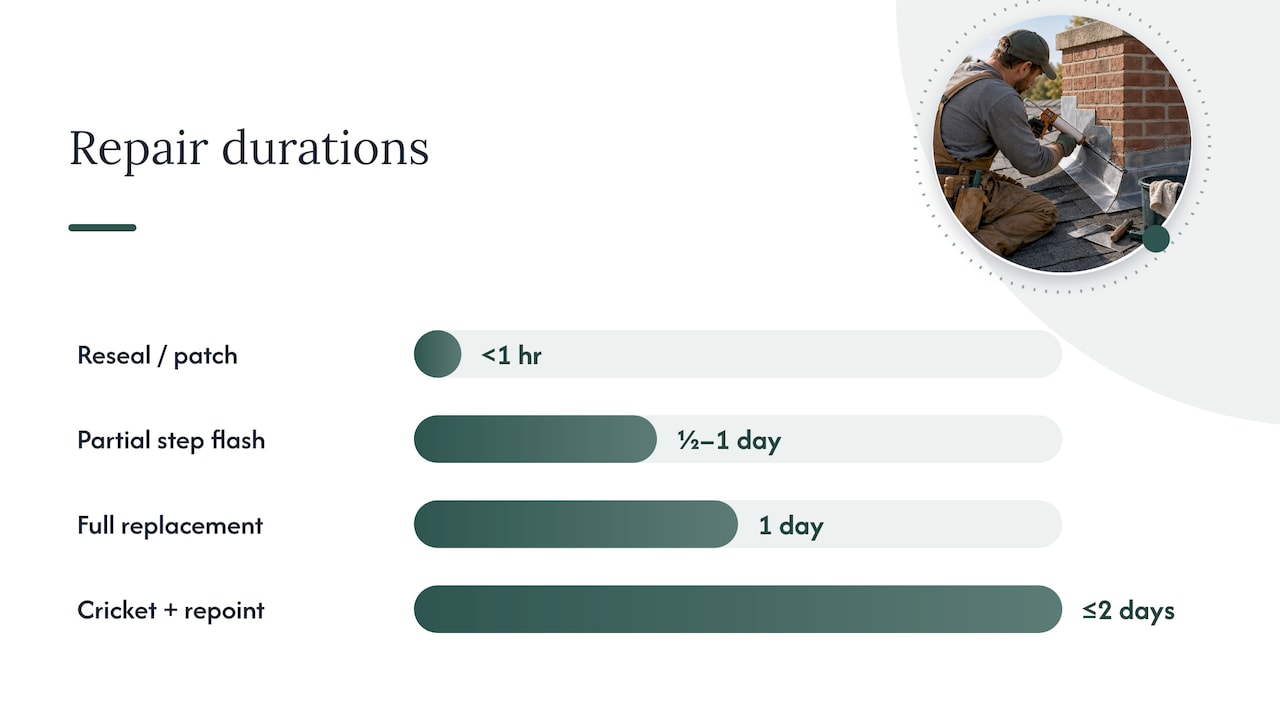
A straightforward reseal or small patch can often be completed in a single visit, sometimes in under an hour once a contractor is on-site. A partial step flashing repair, replacing a section of corroded flashing without touching the whole system, typically takes half a day to a full day depending on chimney size and roof accessibility.
A full flashing replacement, including new counterflashing and reglet work, generally takes a full day, and adding a cricket can push the job to two days when masonry repointing or deck repair is also needed. Scheduling adds time on top of the actual work: expect a lag between the initial estimate visit and the repair date, especially during peak roofing season in spring and fall when contractors are booking multiple jobs per week.
Weather delays are common and worth building into your expectations. A contractor may need to reschedule a booked repair date if rain or high wind moves in, since flashing work depends on dry conditions to seal properly. Asking about a contractor's rescheduling policy upfront avoids frustration if your repair date shifts by a few days.
Why the Cheapest Fix Isn't Always the Right One
The instinct to grab a caulk tube and call it done is understandable, but a reseal on flashing that's already lapped wrong or missing proper counterflashing just delays the same leak. Spend the extra time upfront confirming the actual failure point, not just the symptom, and get the agreed scope in writing before work starts.
— Noah
Get a Roof Leak Assessment From Spagnotti Contracting
If you're seeing water stains near the chimney or flashing that looks lifted or rusted, a roof leak assessment gives you a clear answer before you spend money on the wrong fix. Spagnotti Contracting's roofing services cover everything from a targeted flashing repair to a full roof replacement, with licensed and insured crews handling the work and a written estimate laid out before anything starts.
Expect an on-site visit, photos of the problem area, and a scope that separates flashing work from any masonry or decking repairs it uncovers. If your leak turns out to be tied to gutter runoff rather than the flashing itself, the same visit can flag whether a gutter repair belongs in the fix. Request a roof leak assessment to get a straight answer on what your chimney actually needs.
Where to Verify These Standards Yourself
NRCA roofing guidelines on flashings and crickets cover installation, repair, and cricket sizing recommendations.
IBC 2021 code content outlines accepted practices for flashing and sheet-metal counterflashing.
Sources
FAQ
How much does it cost to repair chimney flashing?
Costs depend heavily on scope: a small reseal or caulk patch tends to fall in the low hundreds of dollars, while a more involved partial repair costs more depending on materials and accessibility. Get an itemized quote from a licensed contractor for your specific chimney and roof condition.
Do roofers repair chimney flashing?
Yes, chimney flashing repair is a standard part of residential roofing work, since flashing is a roofing component rather than a masonry one. Roofing contractors typically handle the flashing itself, while a mason may get involved if the chimney's brick or mortar also needs repair.
How much does it cost to replace chimney flashing?
A full flashing replacement generally costs more than a simple reseal, with the price shaped by chimney size, material choice, and whether a cricket is needed. Copper and larger chimneys with cricket work land at the higher end of that range, while galvanized steel on a smaller, accessible chimney costs less.
Will homeowners insurance cover chimney flashing repair?
Coverage varies by policy and by the cause of the damage, so check your own homeowners policy or ask your insurer.
Recommended
Dealing With Something Similar?
Every property is different, but if this sounds like what you’re seeing, we’re happy to take a look and help you figure out what’s actually going on.