General Contracting
Insulating Basement Walls: Fix Water First, Then Check the Estimate
By Noah Spagnotti

Yes, insulate, but only after you have fixed any water problem. For most existing homes, the safest interior retrofit is continuous rigid foam or closed-cell spray foam with sealed seams, finished with the fire or ignition barrier that exposed foam requires. That approach gives you a warmer, more comfortable basement and lower energy waste without trapping moisture in the wall.
TL;DR:
Before insulating, correct drainage and leaks, remove wet or moldy materials, and confirm the wall has dried; otherwise, insulation can conceal continuing damage.
For unfinished walls, install sealed rigid panels or professionally applied closed cell spray foam; cover exposed material with the required thermal or ignition barrier.
If you use batts in a framed basement wall, avoid interior polyethylene; choose a permeable finish and keep drywall 1/2 inch above the slab.
Seal rim joists, penetrations, and every foam seam before closing the wall, then confirm the local R value and fire barrier requirements during installation.
How R-value and insulation location shape basement wall performance
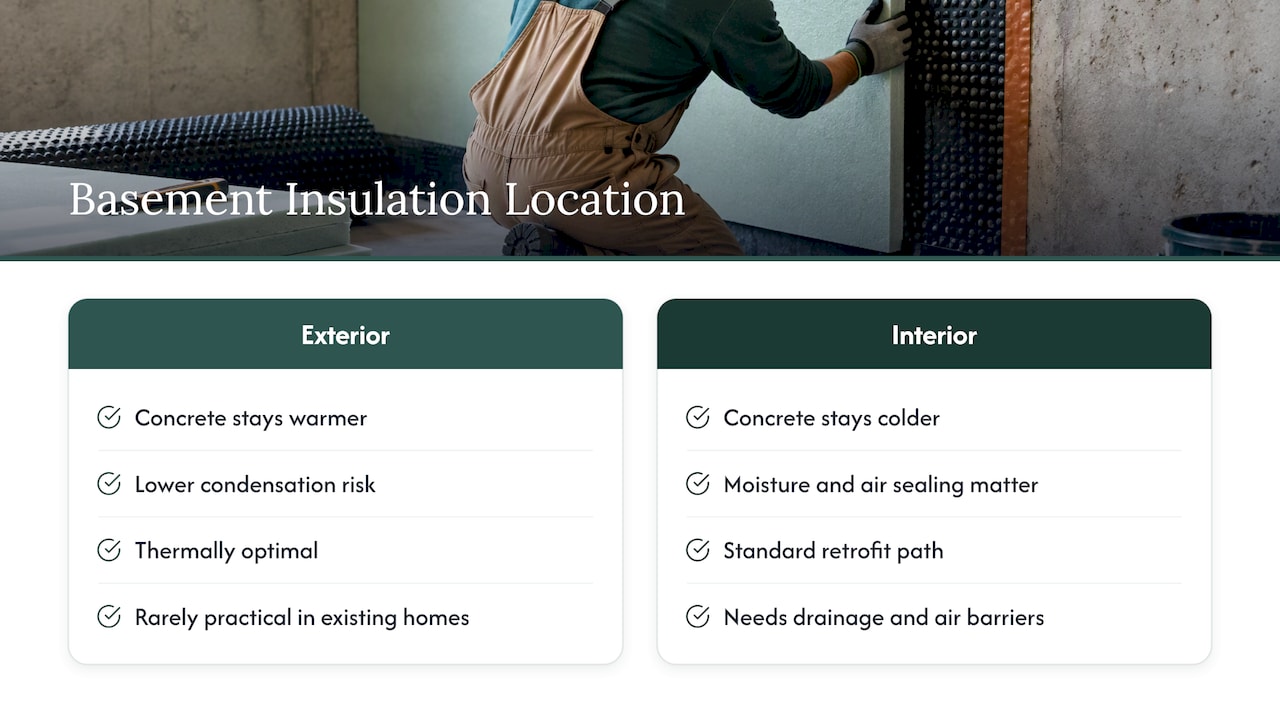
R-value measures how well a material resists heat flow: a higher number means better resistance. Location matters as much as the number. Exterior insulation keeps the concrete warm, which cuts condensation risk. Interior insulation leaves the concrete colder, so moisture and air sealing have to be handled carefully.
Exterior insulation works well but is rarely practical on an existing home, and DOE's High-R Foundations page notes that poorly insulated foundations can account for a significant share of a home's energy loss. Interior foam or spray foam is the standard retrofit path when drainage and air barriers are right. Required R-values follow IECC climate-zone prescriptions, so your local code sets the exact target, and continuous insulation is a common way to meet them. In Omaha, check with the City of Omaha Permits & Inspections.
What insulating basement walls changes: benefits and tradeoffs
Insulation changes more than your utility bill. Here is what to expect:
Energy savings: a continuous thermal boundary at the walls means less heat loss into the ground and surrounding soil.
Comfort: warmer wall surfaces mean fewer cold spots and less of that clammy feeling.
Protected systems: insulating at the walls rather than the ceiling keeps piping and ductwork inside the conditioned space, and DOE's basement insulation fact sheet calls wall insulation preferable to insulating the basement ceiling.
Usable space: a conditioned basement is easier to finish and adds living area.
Cost and labor: foam assemblies cost more than batts, and the work takes real time.
Drying behavior: a wall that was drying freely may dry more slowly once insulated, which is why moisture comes first.
Code complexity: exposed foam needs a thermal or ignition barrier, which adds a step.
Timeline depends on the method. Spray foam goes in quickly, while framing, drywall and finishes set the schedule. Our phased basement finishing timeline shows how the pieces sequence.
Insulating an unfinished basement: three retrofit options
Unfinished basements give you the most freedom. The Building America Solution Center recommends spray foam or rigid foam panels, and common assemblies include:
Rigid foam board. Attach panels with adhesive, seal every seam, and stagger seams if you use two layers. Add furring strips so drywall has something to fasten to. The foam also acts as a capillary break against the concrete.
Closed-cell spray foam. It delivers a continuous air barrier and high R-value per inch. It needs a thermal or ignition barrier and professional application.
Framed stud wall with a foam gap. Place a 1-inch foam capillary break against the concrete, then fill the stud cavity with batt or mineral wool. Keep the drywall and bottom plate 1/2 inch above the slab.
The sequence matters: diagnose and fix water, air seal penetrations, install continuous foam, add framing and finishes, then verify clearances and fire barriers.
Pro Tip: Photograph the wall before anything goes up. Photos of seams, sealed penetrations and the 1/2-inch gap help you confirm the work later.
Insulating a finished or already framed basement
A finished wall hides its problems. Inspect before you add anything:
Look for water stains, peeling paint, damp drywall or musty odors.
Check for efflorescence, the white mineral crust that signals moisture moving through concrete.
Probe baseboards and bottom plates for softness.
Open a small inspection hole to see what is actually in the cavity.
The Building America Solution Center checklist calls for inspecting the basement for bulk water, moisture, or pest damage before work begins so problems can be addressed first. If a framed wall shows moisture, remove the finishes, correct drainage, dry everything out, then install rigid or spray foam. Our guide to checking subfloor moisture first covers the same logic at floor level.
If the wall is truly dry, drill-and-fill cavity insulation or minor upgrades are possible. They have limits, though, and will not match a full retrofit with continuous foam.
Rim joists, sill plates and air sealing
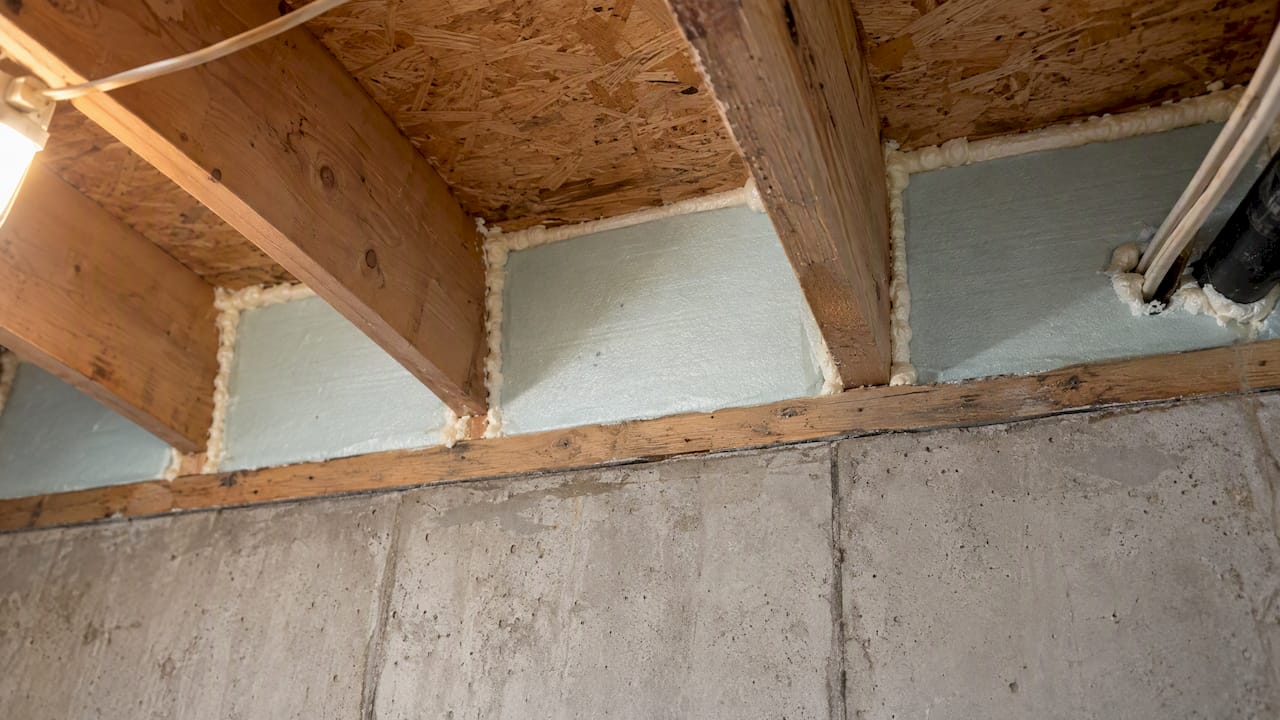
The rim joist is one of the leakiest spots in a house. It is a stack of wood, gaps and penetrations sitting right at the foundation edge, and air moving through it undercuts every R-value you install below.
The Building America checklist calls for sealing rim joist and foundation cracks, seams, and holes, including where the foundation meets the sill plate and where the sill plate meets the rim joist, then insulating directly against the rim joist with closed-cell spray foam or rigid foam board. In practice that means closed-cell spray foam in the rim bays, or cut foam blocks sealed in place with caulk or can foam. Also check the sill plate for gaps and seal wire, pipe and duct penetrations so pests cannot use them.
Moisture management and vapor retarder rules for below-grade walls
Start outside. Grade the soil away from the house, keep gutters and downspouts discharging well clear, and confirm footing drains work. Insulation over a damp wall is a recipe for trouble. Our waterproofing audit case study shows why the diagnosis comes before finishing, and our Omaha waterproofing methods guide covers the options.
The vapor retarder rule is the one homeowners get wrong most often:
Do not cover air-permeable insulation, like batts, with polyethylene on the interior side of a below-grade wall.
Prefer Class II or III retarders, or permeable finishes, so the wall can dry inward.
With foam, follow the manufacturer's perm guidance and choose interior finishes that allow drying.
Keep drywall 1/2 inch above the slab as cheap protection against wicking.
Key rule: Do not install interior Class I vapor retarders over air-permeable basement insulation, because they can trap moisture and cause mold and rot.
Installation best practices and what to verify on estimates
Code requirements depend on your climate zone and local jurisdiction, so ask any contractor which IECC edition and R-value target the bid is built around. Then use this checklist when you compare estimates:
Insulation is continuous, with no skipped corners or gaps behind framing.
Foam seams are sealed, and the air barrier lines up with the insulation.
Spray foam is covered by a thermal or ignition barrier.
Drywall sits 1/2 inch above the slab.
Penetrations and the rim joist are sealed before the wall assembly closes.
Verify during the work, not only afterward. Walk the job before drywall covers the wall, look at seam tape and sealant, and ask for the product data sheets. A good contractor will welcome the questions and put the scope in writing.
Choosing materials: rigid foam, spray foam or fibrous insulation
Match the material to your moisture risk, budget and finishing goals:
Rigid foam: a good capillary break and a clean panel install. It needs careful seam sealing and furring for the finish.
Closed-cell spray foam: the strongest air, thermal and moisture performance, with a higher price and professional installation.
Fibrous insulation in a framed wall: economical when the wall is dry and the assembly can dry to the interior. Never pair it with an interior vapor barrier.
When in doubt about moisture, lean toward foam against the concrete.
Common mistakes to avoid when insulating basement walls
Most failures trace back to a short list of mistakes:
Insulating before fixing water. Adding insulation to a damp wall risks mold and rot, which is why the spray foam retrofit guide says to fix water intrusion and moisture issues before starting.
Installing an interior vapor barrier. DIYers often add one, but an interior vapor barrier can keep a basement wall from drying out, so an assembly that can dry inward is the safer choice. DOE's vapor barrier basics explain how vapor control works.
Skipping the rim joist. Leaving it unsealed lets air bypass the insulation you paid for.
Leaving seams open. Unsealed foam joints let moist air reach the cold concrete.
Running drywall to the slab. Without a gap, the bottom edge wicks water from the slab.
Forgetting the ignition barrier. Exposed foam generally needs one, and inspectors look for it.
Compressing or leaving voids in batts. Squashed or gappy insulation loses performance.
Ignoring local code. The R-value target and fire requirements come from your jurisdiction, not from a product label.
If an estimate does not mention water, air sealing and the rim joist, ask why.
Dealing with potential mold and mildew issues during insulation
Mold is a moisture problem first and a cleaning problem second. If you find it, do not cover it up. Insulating over mold traps it against the wall, where it keeps growing out of sight.
Work in this order:
Find the water source. Check grading, gutters, cracks, window wells and plumbing. Stopping the source matters more than anything else you do.
Remove damaged material. Wet or moldy drywall, carpet and framing that cannot be dried should come out. For a small patch, wear a respirator, gloves and eye protection. For a large area, hire a remediation specialist.
Dry the space completely. Use fans and a dehumidifier, and confirm with a moisture meter before anything gets closed in.
Clean hard surfaces. Concrete can usually be scrubbed and left to dry.
Insulate with a moisture-tolerant assembly. Rigid foam or closed-cell spray foam against the concrete resists moisture better than fibrous products do.
Afterward, keep the basement at a sensible humidity and watch for new stains. The PHRC fundamentals brief notes that basement walls must handle heat, air and moisture flows together, and that interior vapor barriers historically caused failures because walls could not dry. When we inspect a basement, drying potential is part of the conversation from the first visit.
Comparing the environmental impact and health safety of insulation materials
Every common option involves tradeoffs, and none is perfect.
Rigid foam board is lightweight, stable and easy to handle. Foam products are petroleum-based, and their manufacture carries an embodied-carbon cost, but their long service life and energy savings offset some of that over time.
Closed-cell spray foam gives the best air-sealing performance in the fewest steps. It cures into an inert solid, but the installation phase matters: occupants should stay out of the work area during spraying and follow the manufacturer's re-entry guidance. We recommend trained installers for this reason.
Fibrous insulation, whether fiberglass batts or mineral wool, is familiar and affordable. The fibers can irritate skin and lungs during installation, so gloves and a mask are standard. Mineral wool tolerates moisture better than fiberglass and resists fire.
Health in a basement is also about moisture. A material that stays dry and does not feed mold is healthier than a greener one that sits wet in a damp wall. Pick the product that fits your wall's moisture condition first, then weigh embodied carbon and installation safety, and read the manufacturer's safety data sheet before work begins.
Contractor perspective: when to hire pros and what a contractor-led project looks like
Hire a contractor when you see signs of moisture, want a finished living space, or face complex drainage or code questions. A contractor-led project starts with moisture diagnosis, integrates air sealing, finishes foam to code, coordinates trades and gives you a clear timeline. Our basement ceiling options guide shows how we explain tradeoffs before work begins. Our team plans each step in writing so you know what happens next.
I think most basement insulation problems are really sequencing problems. People shop for the product first and the water problem last, when it should be the reverse. A dry wall with modest insulation beats a wet wall with a premium assembly every time. Treat the moisture check as the main event, and the insulation choice gets much easier.
Basement finishing and insulation with Spagnotti Contracting
We handle basement refresh and partial finish projects, along with standard and full finishes with a bathroom or wet bar. We look at moisture first, and our written scope lays out the timeline and the major cost drivers, so you see what moves the price before you commit. Our team builds the insulation retrofit into the finish plan. Request an on-site assessment on our basement finishing page.
FAQ
What R-value is required for basement walls?
It depends on your climate zone and local code. IECC-based prescriptions set the target, and continuous insulation or a cavity plus continuous combination is the usual way to reach it. Ask your contractor which code edition applies, and in Omaha, check with the City of Omaha Permits & Inspections.
Should basement wall insulation be faced or unfaced?
For air-permeable insulation in a below-grade wall, avoid facings that act as an interior Class I vapor barrier. Class II or III facings or permeable finishes let the wall dry inward, so unfaced or permeable-faced products are the safer choice.
How do you install foam board insulation on interior walls?
Glue panels to a clean, dry wall with adhesive, seal every seam, and stagger seams if you use two layers. Then add furring strips for drywall and keep the drywall 1/2 inch off the floor, as the Building America checklist describes.
What are the pros and cons of insulating a basement ceiling?
Ceiling insulation is easier to install, but it leaves pipes and ducts outside the warm space. Insulating the walls instead keeps them inside the conditioned envelope, which is why we usually favor walls. Our ceiling options guide covers the finishing side.
Sources
Spray Foam Interior Insulation for Existing Foundation Walls | Building America Solution Center
Vapor Barriers or Vapor Retarders | Building Science Education
Recommended
Dealing With Something Similar?
Every property is different, but if this sounds like what you’re seeing, we’re happy to take a look and help you figure out what’s actually going on.