General Contracting
Save Headroom or Money: Contractor Rules for Basement Ceiling Options
By Noah Spagnotti
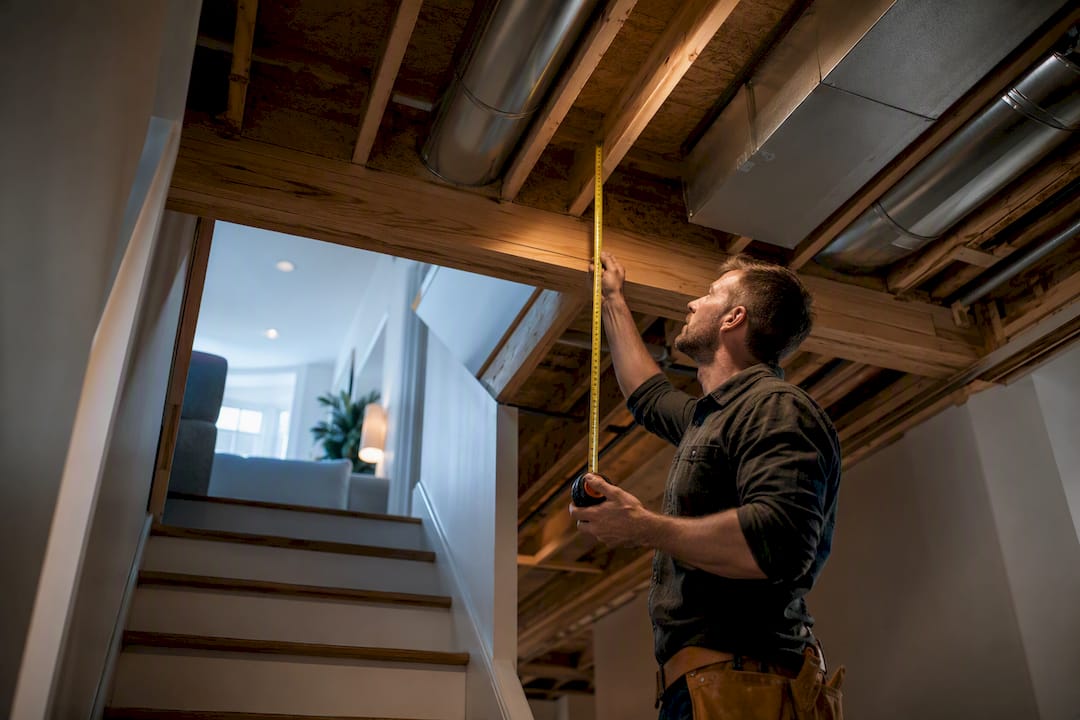
Choose drywall when you want a seamless, high-end finish and can spare an inch of height. Choose a drop ceiling when plumbing, wiring, or HVAC will need regular access. Choose an exposed, painted ceiling when every inch of headroom counts or budget is tight. Slab-to-joist height, checked with a tape measure before anything else, decides which of these actually works in your basement, according to guidance from The Basement Guide.
TL;DR:
Drywall offers the highest-quality finish but reduces headroom by about half an inch to an inch and is less moisture-resistant unless properly specified.
Drop ceilings provide excellent access to plumbing and wiring but require 3 to 6 inches of clearance below pipes or ducts, which can be limiting in low-ceiling basements.
Exposed painted joists cost the least, add no height loss, and work well for modern, industrial, or casual basement styles, but offer limited soundproofing.
The best ceiling choice depends heavily on measured ceiling height, with less than 7 feet favoring exposed or drywall options, while 8+ feet opens up all options.
Proper planning should prioritize measured headroom and access needs over style preferences to avoid costly modifications or compromises later.
Table of Contents
Comparing Your Basement Ceiling Options at a Glance
How Does Drywall Compare for Finish and Soundproofing?
What Makes a Drop Ceiling Worth the Height You Lose?
Can an Exposed Ceiling Actually Look Good?
Are Wood Planks or Beadboard a Good Fit for a Basement?
What About Tin, Corrugated Metal, and Decorative Tiles?
How Do You Decide Which Ceiling Fits Your Basement?
What Should You Watch Out for During Installation?
How Do Contractors Actually Approach This Decision?
What Actually Matters Most in This Decision
Ready to Finish Your Basement Ceiling the Right Way?
Sources
Comparing Your Basement Ceiling Options at a Glance
Every basement ceiling decision comes down to five variables: what it costs, how much height it steals, how easily you can get behind it, how much noise it stops, and how it handles moisture. Here’s how the three main contenders stack up.
Drywall typically runs about $4 to $8 per square foot installed, eats roughly half an inch to an inch of headroom in a direct-mount install, and looks the most finished of any option.
Drop ceilings run about $3 to $6 per square foot for standard grid and tile, but need 3 to 6 inches of clearance below the lowest duct or pipe.
Exposed, painted joists cost the least, roughly $2 to $6 per square foot, and take zero inches of height because there’s nothing to hang.
Ceiling type | Cost per sq ft | Headroom loss | Mechanical access | Soundproofing potential | Moisture resistance |
|---|---|---|---|---|---|
Drywall | $4 to $8 | half an inch to one inch | Poor without access panels | High with resilient channel | Good with moisture-resistant board |
Drop/suspended | $3 to $6 (standard); higher for premium tile | 3 to 6 in | Excellent, tiles lift out | Moderate to high with acoustic tile | Good with PVC/vinyl-faced tile |
Exposed/painted | $2 to $6 | zero inches | Excellent, nothing to remove | Low | Depends on joist material and sealing |
Standard suspended tile still carries an “office ceiling” reputation, but that’s changing fast. Premium coffered panels and wood-look grids close most of the visual gap with drywall while keeping every panel removable.
How Does Drywall Compare for Finish and Soundproofing?
Drywall, still called sheetrock by a lot of homeowners and more than a few contractors, gives you the closest thing to a first-floor ceiling. No grid lines, no visible seams once it’s taped and muddled, just a flat plane you can paint, texture, or run crown molding along. That polish comes at the cost of flexibility: once it’s hung, getting behind it means cutting drywall.
There are two ways to hang it, and they solve different problems.
Direct-attach screws drywall straight to the joists. It’s the cheaper, faster method and costs you almost nothing in height, about half an inch to a full inch.
Resilient channel with Green Glue decouples the drywall from the joists and adds a damping compound between two layers of board. This combination produces the highest STC ratings among common basement ceiling systems, meaning noticeably less footstep noise and voice transfer from the room above.
The trade-off is thickness and cost. Channel systems add an inch or more beyond direct-mount drywall and increase labor, so they make the most sense under a home theater, a teenager’s bedroom, or any room above where noise actually bothers people below.
Drywall’s biggest weakness in a basement is moisture, not sound. Always specify moisture-resistant board (sometimes called “green board” or a mold-resistant paperless product) rather than standard drywall, and pair it with a dehumidifier that keeps basement humidity in check year-round. Plan access panels into the design before drywall goes up, especially near shutoff valves, because cutting one in after the fact is a repair job, not a five-minute task. Professional installation also catches uneven joists and moisture issues before they get buried behind finished walls.
Pro Tip: Mark every shutoff valve and electrical junction box on a simple sketch before drywall goes up. It costs you ten minutes and saves a contractor from guessing where to cut later.
What Makes a Drop Ceiling Worth the Height You Lose?
A suspended ceiling trades headroom for access, plain and simple. The grid hangs from wires below the joists, and dropping in acoustic tile requires 3 to 6 inches of clearance beneath the lowest pipe, duct, or beam. In exchange, every tile lifts out by hand, so a leaky fitting or a dead smoke detector battery is a two-minute fix instead of a drywall patch job.
That access advantage matters more than most homeowners expect. Basements are where the water heater, sump pump, main electrical panel, and half the HVAC ductwork all live. A drop ceiling means a plumber or electrician gets in and out without touching your finished surface.
Standard tile runs on the lower end of the $3 to $6 per square foot range and is genuinely DIY-friendly for a handy homeowner.
Acoustic tiles absorb sound rather than just blocking it, which noticeably softens echo in an open basement, and moisture-resistant, vinyl-faced tiles hold up far better below grade than old-style fiberboard.
Architectural tile lines, including wood-look panels, coffered squares, and slim two-inch grids, have narrowed the aesthetic gap with drywall considerably, based on design trends Lowe’s tracks in basement remodels.
If your basement has 8 feet or more of slab-to-joist height, a drop ceiling barely registers as a compromise. Under 7.5 feet, even a low-profile grid can start to feel tight, especially near ductwork that already hangs lower than the joists around it.
Can an Exposed Ceiling Actually Look Good?
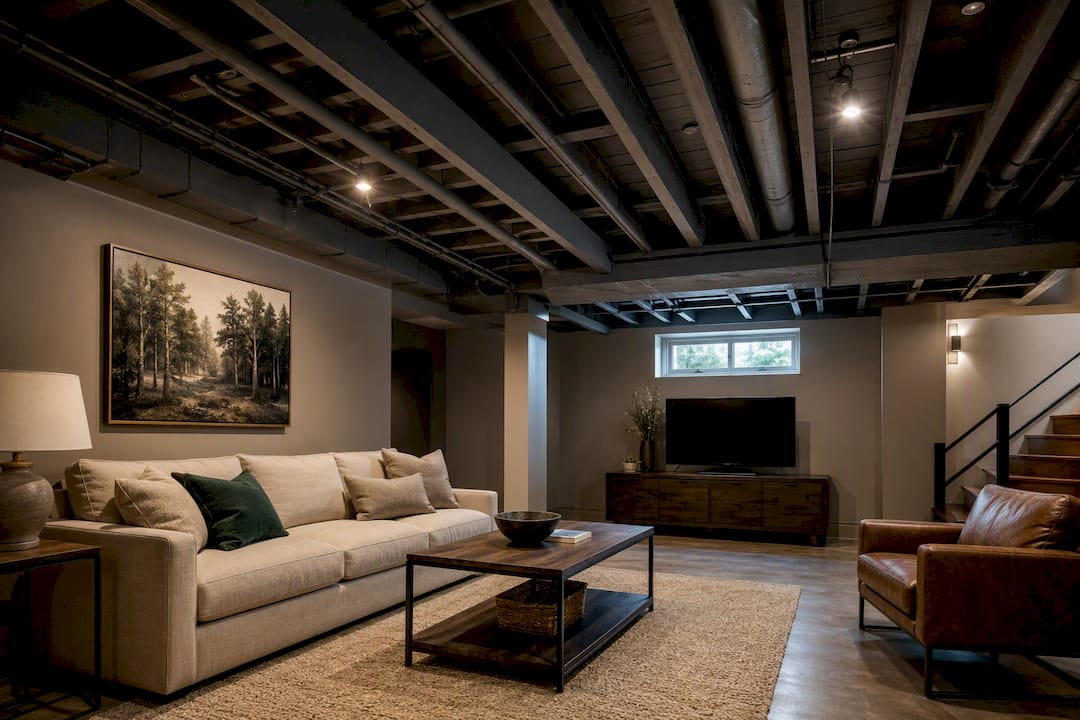
Yes, and it’s not just a budget fallback. Painting the joists, subfloor, and every visible duct and pipe a single flat, dark color, black, charcoal, or deep matte green, turns visual clutter into a unified plane that reads as a design choice rather than an unfinished basement. Design guidance from BobVila backs this up: a monochrome flat finish is what separates an intentional industrial look from a room that looks abandoned mid-project.
Zero headroom loss is the obvious win here, which makes exposed ceilings the default choice for home gyms, home theaters, and basement bars where every inch of standing room matters. The trade-off is sound. Nothing absorbs footstep noise or muffles voices from above, so upstairs foot traffic carries straight through.
Use flat or matte paint, never gloss, since sheen highlights every imperfection in old framing.
Group wiring and conduit into neat, painted runs rather than letting them crisscross randomly.
Add acoustic panels or hanging baffles later if noise becomes a problem, without touching the ceiling structure itself.
Pro Tip: Spray paint, not roller paint, gets even coverage into the gaps between joists and ductwork. A roller leaves streaky shadows that undercut the whole “intentional” look.
Are Wood Planks or Beadboard a Good Fit for a Basement?
Wood planks and beadboard bring warmth that drywall and drop tile can’t match, but basements are unforgiving toward real wood. Solid tongue-and-groove pine looks fantastic and costs the most, while engineered wood-look planks and PVC beadboard cost less and shrug off humidity that would eventually warp or stain solid lumber.
Solid wood delivers the richest look but needs a sealed, low-humidity basement to avoid warping over time.
Engineered planks hold up better against moisture swings while keeping most of the wood-grain appearance.
PVC beadboard is essentially moisture-proof and often the smartest pick for a below-grade ceiling, at a modest premium over paint alone.
Headroom loss stays minimal, generally similar to direct-mount drywall, and the style fits cottage, farmhouse, or lake-house basement designs particularly well. Seal every seam and keep a dehumidifier running regardless of material, since trapped humidity behind planks is what causes the mold problems homeowners blame on the wood itself.
What About Tin, Corrugated Metal, and Decorative Tiles?
Tin ceiling tiles, corrugated metal panels, and decorative PVC tiles give a basement genuine character that flat drywall never will. Reflective metal finishes also bounce light around a room that usually has small, high windows or none at all, which makes a basement bar or entertainment space feel less like a cave.
Tin tiles in silver, copper, or bronze finishes work well as accent ceilings over a bar or media nook rather than an entire basement.
Corrugated metal sheets bring an industrial edge and pair naturally with exposed ductwork already painted a matching tone.
Decorative PVC tiles mimic tin’s pattern detail at a lower cost and, unlike real metal, never rust in a damp basement.
Costs vary widely by material and finish, generally landing between standard drywall and premium drop tile. Stick to moisture-resistant metal coatings or PVC in any room without a dedicated dehumidifier.
How Do You Decide Which Ceiling Fits Your Basement?
Start with a tape measure, not a design magazine. Measure from the concrete slab to the bottom of the joists, then subtract the thickness of whatever system you’re considering to see how much finished headroom you’ll actually have.
Under 7 feet finished: Stick with exposed/painted joists or direct-mount drywall. A drop ceiling’s 3 to 6 inch clearance requirement often makes it impractical at this height without raising the slab or lowering utilities.
7 to 7.5 feet: A low-profile drop grid can work, but standard tile depth may feel cramped. Direct-mount drywall is usually the safer bet.
7.5 to 8 feet: All three main options are realistically on the table. Priority, not constraint, should drive the decision now.
8 feet or more: Headroom stops being a limiting factor entirely, opening the door to premium coffered tile, thicker acoustic assemblies, or double-layer soundproofed drywall.
If you need… | Choose |
|---|---|
Frequent utility access | Drop/suspended ceiling |
A finished bedroom or home office | Drywall |
Maximum sound control | Drywall with resilient channel and Green Glue |
Every inch of height | Exposed, painted joists |
The lowest upfront cost | Exposed, painted joists |
Moisture-prone conditions | Drop ceiling with PVC tile or sealed beadboard |
Before calling a contractor for estimates, know your measured headroom, your budget range per square foot, and which one or two priorities from that table matter most to you. That short list turns a vague “what are my basement ceiling options” conversation into a fast, specific quote.
What Should You Watch Out for During Installation?
Lighting decisions get made too late more often than any other basement ceiling mistake. Recessed can lights need drywall or a solid ceiling plane to sit in; drop ceilings use surface-mount or recessed troffer fixtures made specifically for grid systems, and exposed ceilings usually rely on track lighting or pendants hung from the joists themselves. Pick your ceiling type before you shop for fixtures, not after.
Moisture control isn’t optional in any basement, regardless of ceiling choice. Run a dehumidifier year-round, use moisture-resistant materials wherever water is even a remote possibility, and address any existing water intrusion issues before finishing the ceiling over it.
Place access panels directly above shutoff valves, cleanouts, and electrical junctions, never in a random spot chosen for symmetry.
Check local code on fire-rated drywall if the space includes a bedroom or accessory dwelling unit; requirements vary by jurisdiction.
Never bury an electrical junction box behind sealed drywall. Code requires it stay accessible.
Pro Tip: Take photos of every pipe, wire run, and duct before any ceiling material goes up. It’s the cheapest insurance policy against a costly guessing game two years from now.
How Do Contractors Actually Approach This Decision?
A contractor walks into a basement project the same way every time: tape measure first, opinions second. Height gets logged at multiple points across the room, since older basements rarely have perfectly level joists. Then comes a walkthrough to map every plumbing shutoff, electrical junction, and HVAC run, because access strategy has to get decided before material does, not after drywall is already hung.
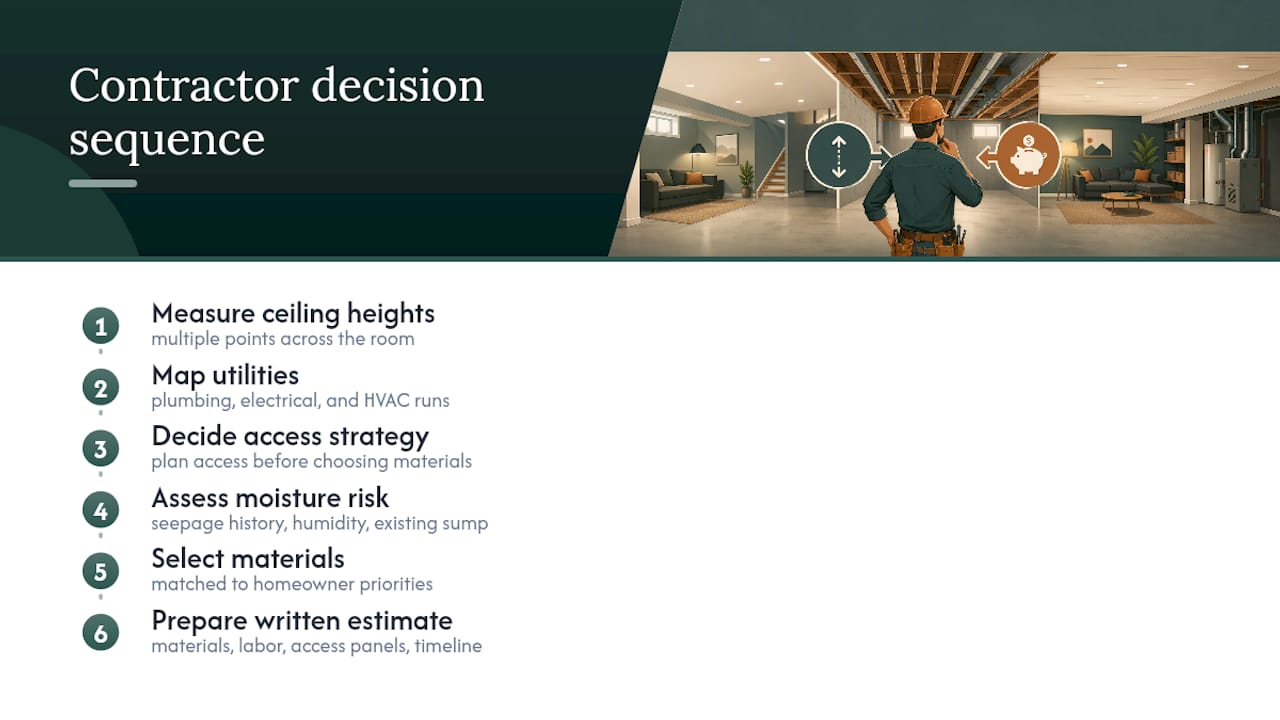
Moisture risk gets assessed next: any history of seepage, humidity levels, existing sump equipment. Only then does material selection happen, matched against the homeowner’s actual priorities rather than whatever looked good on social media.
A written estimate should spell out material, labor, access panel locations, and a realistic timeline before a single tool comes out.
What Actually Matters Most in This Decision
Most basement ceiling advice treats this like a style question first and a measurement question second. That’s backwards. Headroom is a hard physical limit, and no amount of Pinterest inspiration changes what fits in a 7 foot 2 inch basement. Get the tape measure out before you fall in love with a coffered tile pattern that needs 6 inches of clearance you don’t have.
The bigger blind spot, though, is access planning. Homeowners fixate on the finished look and skip the plumbing and wiring conversation entirely, then get surprised two years later when a leak means cutting a hole in a ceiling they just paid to finish. If there’s one piece of conventional wisdom worth ignoring, it’s “pick drywall, it always looks nicer.” Sometimes it does. But a drop ceiling over a mechanical-heavy basement isn’t a compromise, it’s the smarter long-term call.
Prioritize in this order: measured headroom, then access needs, then finished look, then budget. Get that sequence backwards and you’ll end up re-doing work that a clear-eyed decision would have avoided the first time.
— Noah
Ready to Finish Your Basement Ceiling the Right Way?
Reading about drywall thickness and drop-ceiling clearance only gets you so far. At some point, someone has to measure your actual joists, map your actual plumbing, and tell you what your actual basement can handle. That’s where Spagnotti Contracting comes in for Omaha-area homeowners who’d rather hand off the guesswork than spend three weekends researching STC ratings.

Basement finishing covers the whole job, not just the ceiling: framing, drywall installation, and interior painting all fall under one estimate instead of three separate contractor conversations. A consultation starts with the same height-and-utility assessment described above, followed by a written estimate that spells out material costs, access panel placement, and a realistic project timeline before any work begins.
If you’re ready to turn your basement into finished living space, request an estimate for your basement finishing project and get a plan built around what your specific ceiling height and utilities actually allow.
Sources
Recommended
Dealing With Something Similar?
Every property is different, but if this sounds like what you’re seeing, we’re happy to take a look and help you figure out what’s actually going on.