General Contracting
Contractor Audit Stops Rework: Basement Waterproofing Before Finishing
By Noah Spagnotti

Do not finish a basement until you’ve fixed active leaks, addressed drainage, and proven the space stays dry through a full wet season. Three things come before framing: divert water away from the foundation (grading and gutters), stop active seepage with interior drainage and a working sump pump, and confirm dryness with real monitoring, not a lucky dry week. If exterior excavation, drain tile replacement, or structural cracks are involved, that’s a job for a contractor, not a weekend project.
TL;DR:
Proper exterior grading, gutter maintenance, and downspout extensions are the most cost-effective ways to prevent water accumulation against the foundation before interior waterproofing.
Active seepage requires interior drainage and sump pump testing, with backup power added to ensure reliability during storms, before finishing the basement.
Moisture under the surface indicates water movement through the wall, requiring drainage fixes, while surface condensation can be managed with ventilation and dehumidification.
Exterior waterproofing offers a thorough solution for hydrostatic pressure but involves significant cost and disruption, whereas interior systems are cheaper, managing water after entry.
Continuous monitoring of humidity, sump pump function, and moisture levels over a full wet season is essential to confirm your basement remains dry before finishing.
Spagnotti Contracting
Plan Your Basement Project With Confidence
Spagnotti Contracting helps Omaha homeowners plan and manage renovations with detailed estimates, quality workmanship, and clear communication.
Table of Contents
Basement Waterproofing Before Finishing: The Prioritized Checklist
How Do You Tell Condensation From an Active Leak?
Interior vs Exterior Waterproofing: Which One Do You Need?
How to Prep Basement Surfaces Before Waterproofing
How Do You Prove a Basement Is Actually Dry?
Keeping a Finished Basement Dry Long Term
A Contractor’s View on Pre-Finish Waterproofing
How Spagnotti Contracting Handles Basement Waterproofing and Finishing
Sources
FAQ
Basement Waterproofing Before Finishing: The Prioritized Checklist
Basement waterproofing before finishing follows a specific order. Skip a step and you risk finishing over a problem that resurfaces behind drywall six months later.
Start outside. Clean gutters, extend downspouts so water discharges 10 to 15 feet from the foundation, and regrade any low spots that pool water against the house. This is the cheapest, highest-value fix available, and it’s the same advice a masonry contractor or drainage specialist gives before touching a single interior wall.
Check window wells and visible drain tile. Clogged wells fill like buckets during heavy rain. If exterior drain tile is exposed anywhere, look for collapsed sections or disconnected joints.
Test the sump pump. Pour a five-gallon bucket of water into the basin and confirm it cycles on, drains fully, and shuts off. If there’s no backup pump or battery system, add one before finishing, since a single power outage during a storm can undo months of work.
Handle interior quick fixes. Pull out any wet insulation or moldy drywall, dry the surfaces completely, and seal obvious hairline cracks.
Call a professional for anything structural. Excavation, full drain tile replacement, and cracks wider than a credit card edge or showing displacement need an engineer or waterproofing contractor, not a tube of caulk.
Pro Tip: Fix the outside first, always. A sump pump working overtime because your downspouts dump water two feet from the foundation is treating a symptom, not the cause.
How Do You Tell Condensation From an Active Leak?
The moisture type determines the fix, and guessing wrong wastes money on the wrong solution. Run the plastic sheet test: tape a piece of aluminum foil or plastic wrap tightly to the wall and check it after 24 hours. Moisture on the outside surface facing the room means condensation, a humidity problem you fix with ventilation and a dehumidifier. Moisture trapped underneath, against the wall, means water is moving through the concrete itself, which points toward seepage and a drainage fix.
Other signals to watch for:
Efflorescence (white, chalky mineral deposits) means water has passed through the wall and evaporated, leaving salts behind. It’s evidence of past moisture movement even if the wall looks dry today.
Active weeping or running water during or right after rain or snowmelt points to hydrostatic pressure pushing groundwater through cracks or porous block.
A musty, sewage-like odor paired with round-the-clock dampness, regardless of weather, often points to a plumbing issue rather than a foundation one.
Localized puddling near a floor drain or pipe suggests plumbing, while dampness that spreads along the base of exterior walls suggests foundation seepage.
Cracks that are widening, stair-stepping, or paired with a bowing wall need a structural evaluation before anything else happens.
Interior vs Exterior Waterproofing: Which One Do You Need?
Neither interior nor exterior waterproofing is universally better. The right choice depends on what’s actually causing the moisture and how much disruption and budget you can absorb.
Exterior waterproofing involves excavating around the foundation, applying a waterproof membrane to the exterior wall, and installing exterior drain tile at the footing. It’s the most thorough fix because it stops water before it ever reaches the concrete, which makes it the right call when hydrostatic pressure or high groundwater is the root cause. The tradeoff is cost and disruption: excavation tears up landscaping, and exterior systems typically have significant costs due to excavation and materials.
Interior waterproofing uses a perimeter drain (often called an interior French drain) set into the slab along the foundation walls, routing water to a sump pump. Interior membranes and dimple boards can line the wall to direct seepage down to that drain. This approach is less disruptive and generally cheaper, in the $3,000 to $15,000 range, but it manages water after it enters rather than stopping it at the source.
Sodium silicate and crystalline sealants sit in a different category entirely. These penetrate the concrete surface and reduce vapor transmission, which helps with minor seepage and general dampness. They are not a fix for active water under hydrostatic pressure, so applying a sealant to a wall that’s actively weeping is a wasted afternoon.
A rough decision guide:
Minor dampness, no active leaks, no visible cracks → coatings or crystalline sealant plus a dehumidifier.
Seasonal seepage or a wet corner during heavy rain → interior drain and sump pump.
Constant groundwater pressure, bowing walls, or repeated flooding → exterior excavation and membrane.
How to Prep Basement Surfaces Before Waterproofing
Surface prep decides whether the fix lasts. Applying any coating or sealant over a damp, dirty wall traps moisture behind the treatment and can make the underlying problem worse, not better.
Dry the concrete completely before treating it. Run fans and a dehumidifier for several days if the wall has been wet.
Remove efflorescence with a stiff brush and a mild acidic cleaner made for masonry, then rinse and let the surface dry again.
Match crack repair to crack type. Epoxy injection works for structural, full-depth cracks; mortar patches suit wider, non-structural cracks; polyurethane injection is built specifically for cracks that are actively leaking.
Statistic Callout: According to Basement Moisture Lab, homeowners who finish over unresolved moisture often pay two to three times more later, once they factor in tearing out ruined drywall, replacing insulation, and remediating mold, compared with waterproofing correctly the first time.
Most sealants and coatings need to cure fully, often 24 to 72 hours depending on the product, before you install framing, adhesives, or vapor barriers against that wall. Read the label. Rushing this step is how a good product ends up trapped behind bad framing.
How Do You Prove a Basement Is Actually Dry?
One good week doesn’t mean anything. Basements fail during specific weather events, and testing has to account for that.
Repeat the plastic sheet test after any repairs, on multiple walls, and compare results to your original readings.
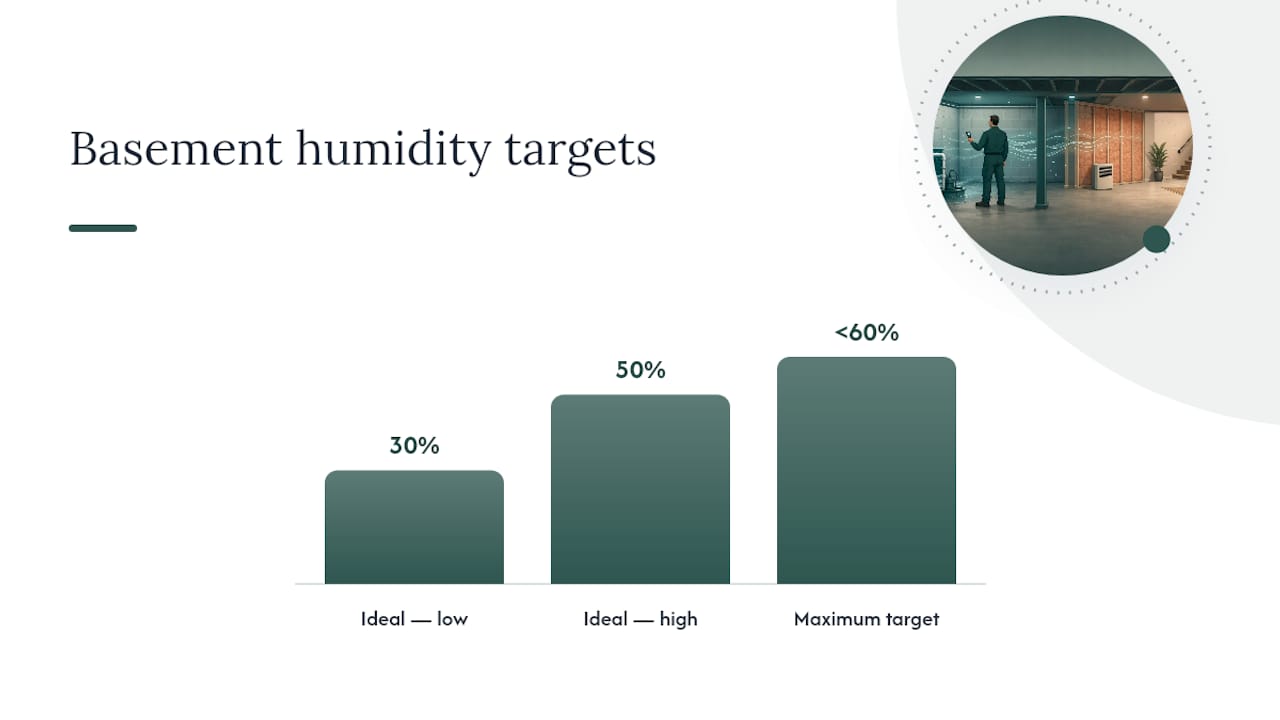
Use a humidity meter and track the room over time. Aim to keep living-space humidity under 60%, with 30% to 50% as the ideal range most days.
Run the sump pump pour test again after repairs, and confirm the backup power source works, whether that’s a battery backup or a water-powered secondary pump.
Monitor through a full wet season. Contractors and moisture specialists recommend watching a basement through spring thaw or a stretch of heavy rain before calling it finish-ready, since a dry basement in October can flood in April.
Pro Tip: Keep a simple log, a notebook on the workbench, or a phone note works fine. Jot the humidity reading and any visible moisture every week for a season. Patterns show up in data that they never show up in memory.
Scheduling matters too. Drier months tend to be the easier window for excavation or exterior coating work, so if exterior work is on the table, plan around that.
Keeping a Finished Basement Dry Long Term
Waterproofing isn’t a one-time event; it’s a system you maintain. A few habits protect the investment you just finished paying for.
Clean gutters at least twice a year and check that downspout extensions still discharge well away from the foundation, since a disconnected extension undoes the whole fix.
Inspect window wells and seals annually, ideally before the rainy season starts.
Run the dehumidifier consistently and empty or drain it as needed, keeping humidity in that 30% to 50% band.
Test the sump pump every few months, and replace it proactively; most units last 7 to 10 years, and a pump that runs constantly or makes grinding noises is telling you it’s near the end.
A Contractor’s View on Pre-Finish Waterproofing
Most basement failures we see trace back to treating waterproofing as a single product instead of a system. Grading fixes the water before it arrives. Interior drainage and a sump pump handle what still gets through. Sealants manage vapor. A dehumidifier controls what’s left in the air. Skip one layer, and the others get overworked.
The audit worth running before any framing goes up: gutters and grading checked, sump tested under a pour, humidity logged for at least a few weeks, and every crack identified and matched to the right repair. Homeowners who skip that sequence almost always regret it, usually around month eight, when a wall they assumed was fine starts sweating behind new drywall.
— Noah
How Spagnotti Contracting Handles Basement Waterproofing and Finishing
A professional contractor runs the pre-finish audit before a single stud goes up, not after. That’s the real difference between hiring a finishing crew and hiring a contractor who treats waterproofing as part of the job: exterior grading review, interior drainage and sump installation where needed, sump testing, and humidity monitoring, all coordinated before framing starts.

The process runs estimate, plan, verified waterproofing, then finish, so nothing gets covered up until it’s actually confirmed dry. For homeowners in the Omaha metro area planning a basement finish, that sequencing is what prevents the two-to-three-times-cost rework mentioned earlier. If your gutters and downspouts need attention first, Spagnotti Contracting also handles gutter installation and repair as its own project. Get a personalized estimate through the full services page or explore basement finishing in Omaha to see how the audit fits into your project timeline.
Sources
For deeper detail on methods and costs, see This Old House on prep and repair, The Spruce on system-based waterproofing, and DryBasementHub on cost comparisons.
FAQ
How Much Does It Cost to Waterproof a 1,000 Square Foot Basement?
Costs depend heavily on method: interior drainage and sump systems typically run $3,000 to $15,000, while full exterior excavation and membrane work runs $10,000 to $30,000 for comparable square footage.
What Is the First Thing to Do When Finishing a Basement?
Fix exterior drainage first, meaning gutters, downspout extensions, and grading, since that’s the cheapest and highest-value step before touching sump pumps, sealants, or framing.
Should I Waterproof My Basement From the Inside or Outside?
It depends on the cause: interior systems intercept water after it enters and cost less, while exterior systems stop water before it reaches the foundation and cost more but address hydrostatic pressure directly.
What Should You Avoid When Finishing a Basement?
Avoid finishing over unresolved moisture or unverified sump systems; rushing to finish before proving dryness through a wet season is the single most expensive mistake homeowners make.
Recommended
Dealing With Something Similar?
Every property is different, but if this sounds like what you’re seeing, we’re happy to take a look and help you figure out what’s actually going on.