General Contracting
Homeowners: Fix Crown Molding Cracks Under 1/4 Inch or Call a Pro
By Noah Spagnotti
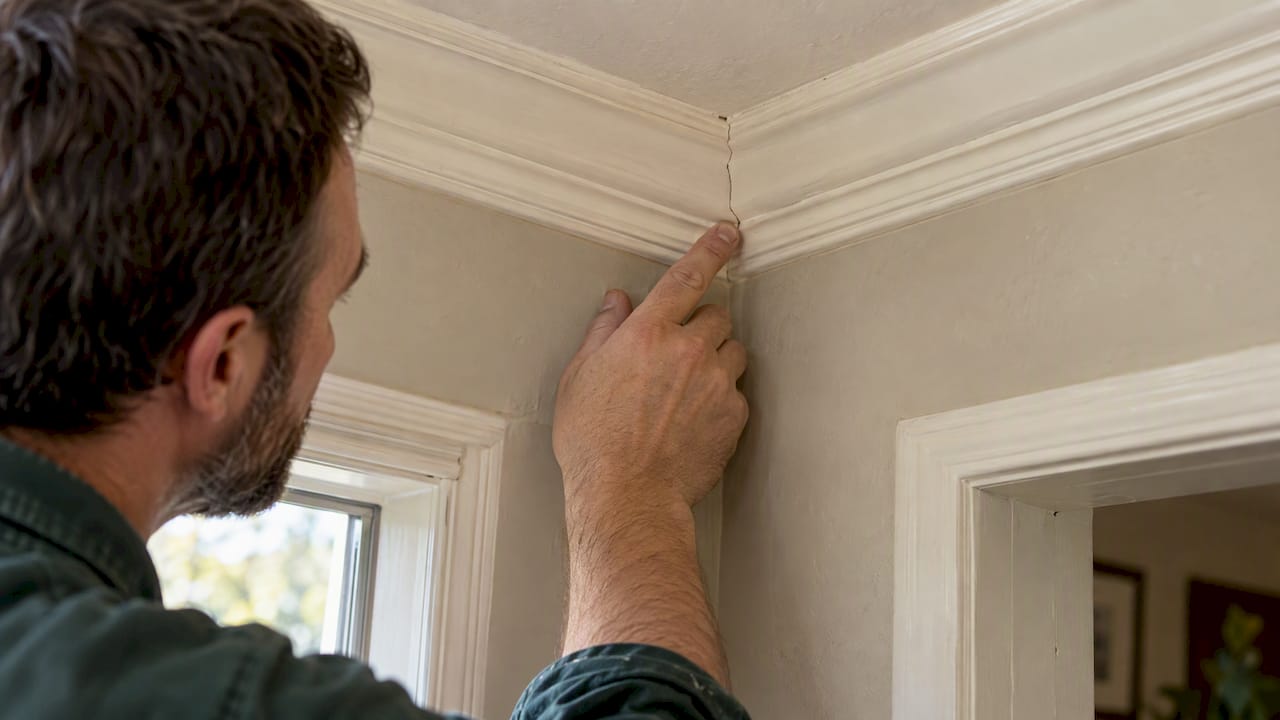
Most crown molding cracks are cosmetic, caused by seasonal wood movement or truss uplift, and a paintable flexible caulk fixes them for good. Measure the gap first: if it is under a quarter inch and shows no other warning signs, you can caulk or fill it this weekend. If you see diagonal cracks near doors or windows, or the gap keeps widening, stop and get an inspection before you touch the trim.
TL;DR:
Gaps under a quarter inch and without diagonal or widening cracks are usually caused by seasonal wood movement or truss uplift, not structural issues.
Proper repair involves cleaning old caulk, filling larger gaps with wood filler if needed, then applying flexible acrylic-latex caulk for elasticity and paintability.
Ensuring the molding is secured into studs or ceiling joists, rather than drywall alone, prevents recurring cracks caused by shifting or movement.
Maintaining consistent indoor humidity between 30 and 55 percent reduces seasonal wood movement and minimizes crack formation.
For persistent or suspicious cracks, especially near doors or windows, an inspection by a professional is recommended to rule out structural problems.
What causes crown molding cracks and gaps
Wood is hygroscopic, meaning it absorbs and releases moisture depending on the humidity around it, and that constant exchange makes it shrink and swell with the seasons. According to Oklahoma State University Extension, wood shrinks in the dry air of winter and swells again once humidity rises, which is exactly when homeowners notice gaps opening up along the crown molding seam. The wood itself did not fail. It simply moved with the air around it, the way it always will.
Truss uplift adds a second layer to the problem. Roof trusses can bow slightly during cold, dry months as the top and bottom chords dry at different rates, lifting the center of the ceiling away from the exterior walls. Because the ceiling and the walls are framed as separate structural systems, they do not always move together, and crown molding sits right at that seam. A molding strip nailed solidly to both surfaces has nowhere to go when one side shifts, so it cracks or pulls away.
A few other causes show up often enough to rule out before you blame the wood:
Poor fastening during the original install, where molding was nailed only into drywall instead of into studs or ceiling joists
Moisture intrusion from a roof leak, bathroom exhaust, or plumbing issue that swells the trim unevenly
Insect damage, particularly in older homes, that weakens the wood behind a painted surface that looks fine
Settling in new construction, which usually shows up within the first year or two as framing lumber finishes drying out
Most of these causes point to something ordinary and fixable. A smaller share point to something worth a second look, which is where triage comes in.
How to tell a cosmetic crack from a structural problem
Not every crack deserves a phone call to a contractor, but a few patterns are worth taking seriously. HouseWiseLab notes that cracks at the wall-ceiling joint are most often tied to seasonal wood movement or truss uplift and are typically cosmetic, while structural concerns tend to show a different pattern entirely, such as diagonal cracking near door or window openings.
Walk through these checks before deciding your next move:
Measure the gap with a tape measure or feeler gauge. Anything under a quarter inch is almost always cosmetic.
Look at the shape. A straight, even gap running along the molding seam is typical of wood movement. A diagonal crack radiating from a door or window frame is not.
Check whether the crack is isolated to the molding or continues down the wall or across the full ceiling. A crack that travels is a different problem than one that stops at the trim.
Test nearby doors and windows. If they are suddenly sticking or binding, something structural may be shifting.
Note the timing. A crack that appeared gradually over a season is normal. One that showed up overnight after a heavy snow load or water event is not.
Take a dated photo and measure the gap again in four to six weeks. If it is stable, you are looking at seasonal movement.
Isolated molding gaps usually point to shrinkage rather than foundation failure, and inspection professionals recommend consulting an ASHI-certified inspector only when defined red flags appear. That single standard does a lot of work: it tells you most gaps do not need an engineer, and it tells you exactly who to call when one does. If you want a second opinion on a hairline crack elsewhere in the house, compare it against the same red-flag patterns above — diagonal cracks near openings, sudden overnight appearance, or doors and windows that suddenly stick — before escalating.
Step-by-step repair: preparing, removing old caulk, and finishing
A durable repair depends more on preparation than on the caulk you buy. Rushing the prep step is the single biggest reason trim repairs fail within a year.
Check conditions first. Caulk and filler cure best above 40°F with the room at normal indoor humidity. Avoid patching during an unusually dry or damp stretch, since the gap size you see that day may not be the gap size you get in three months.
Protect the area. Lay a drop cloth, mask the wall and ceiling paint lines with painter's tape, and vacuum dust out of the seam so the new material bonds to clean surfaces.
Remove the failed material. Dig out old, cracked caulk with a utility knife or a 5-in-1 tool, and scrape away any loose paint, plaster, or drywall compound. If you skip this step, new caulk just sits on top of old, already-failing caulk.
Inspect the molding itself. If a section is split, warped, or pulling away from more than one fastener, it is often faster to pull and replace that piece than to caulk around a problem that will reopen.
Fill large gaps first. For gaps wider than an eighth of an inch, pack in a paintable wood filler or lightweight spackle before caulking, so the caulk bead stays thin and flexible instead of sagging.
Apply the caulk. Cut the tube tip small, run a steady bead along the seam, and tool it immediately with a wet finger or a caulk smoothing tool for a clean, concave line.
Let it cure fully. Most acrylic-latex caulks need 24 to 48 hours before painting; check the tube, since rushing this step is what causes paint to crack along the seam later.
Sand lightly, prime if needed, and paint. A light sanding on any dried filler, followed by a spot primer on bare wood, keeps the finish coat from flashing or looking patchy.
Pro Tip: If the same spot reopens every winter no matter how well you caulk it, the molding is likely fastened only into drywall. Re-securing it into a stud or joist usually solves the recurrence for good.
Watch for three common failure patterns: a caulk bead that cracks again within a season usually means it was applied too thick or in the wrong temperature range, show-through under paint usually means the caulk was not fully cured before painting, and a gap that keeps returning to the same spot almost always means a fastening issue, not a caulk issue.
Best materials and tools for a durable repair
Not all caulks behave the same way once they are painted over and exposed to a full year of temperature swings. Acrylic-latex paintable caulk is the standard choice for crown molding because it flexes with seasonal movement and takes paint well, while low-modulus hybrid sealants offer even more flexibility for wider or more active gaps. Rigid wood filler and spackle have their place too, but only for gaps you expect to stay static, like a nail hole or a solid seam, since they will crack if the trim keeps moving.
Acrylic-latex paintable caulk for seams that move seasonally and need to hold paint without cracking
Low-modulus hybrid caulk for wider gaps or spots that see more movement than a standard seam
Lightweight spackle or wood filler for static gaps, nail holes, and small chips that will not flex
A caulk gun, 5-in-1 tool, and flexible putty knife for clean application and tooling
120 and 220 grit sandpaper for smoothing filler before priming
Manufacturer product data for interior trim sealants often references standards like ASTM C920, a quality benchmark covering flexibility, adhesion, and application conditions for sealants used on wood and drywall trim. Checking for that reference on the tube is a quick way to confirm you are buying a caulk built for movement, not just a generic filler.
Prevention: installation and environmental fixes that reduce recurrence
Most recurring crown molding cracks trace back to one of two things: humidity swings in the house, or how the trim was installed in the first place. Fixing both cuts down on how often you find yourself back here with a caulk gun.
Keep indoor relative humidity as stable as practical year-round; a humidity range of roughly 30 to 55 percent is a common benchmark for wood trim and flooring, with a humidifier in winter and a dehumidifier in summer helping close the gap
Finish every surface of wood trim, including the back and ends, before installation, since sealing all sides slows moisture exchange and reduces the size of seasonal movement
Consider two-piece or floating molding, which lets the ceiling and wall pieces move independently instead of fighting each other at a single rigid seam, a detail covered in more depth in our comparison of crown and cove molding
Fasten molding into studs and ceiling joists rather than relying on drywall alone, which holds the trim through seasonal shifts instead of pulling loose with the drywall surface
Choose dimensionally stable materials like MDF, polyurethane, or PVC trim in rooms prone to humidity swings, such as bathrooms or finished basements, where solid wood moves the most
When to hire a contractor and what a professional evaluation covers
A contractor evaluating crown molding damage checks more than the crack itself. They look at attic framing for signs of truss uplift, inspect nearby drywall and insulation for water staining, and test whether the gap is isolated or connects to a larger settling pattern. If water damage shows up, a proper structural check comes before any cosmetic patch, since patching over a wet or soaked section just hides the real problem.
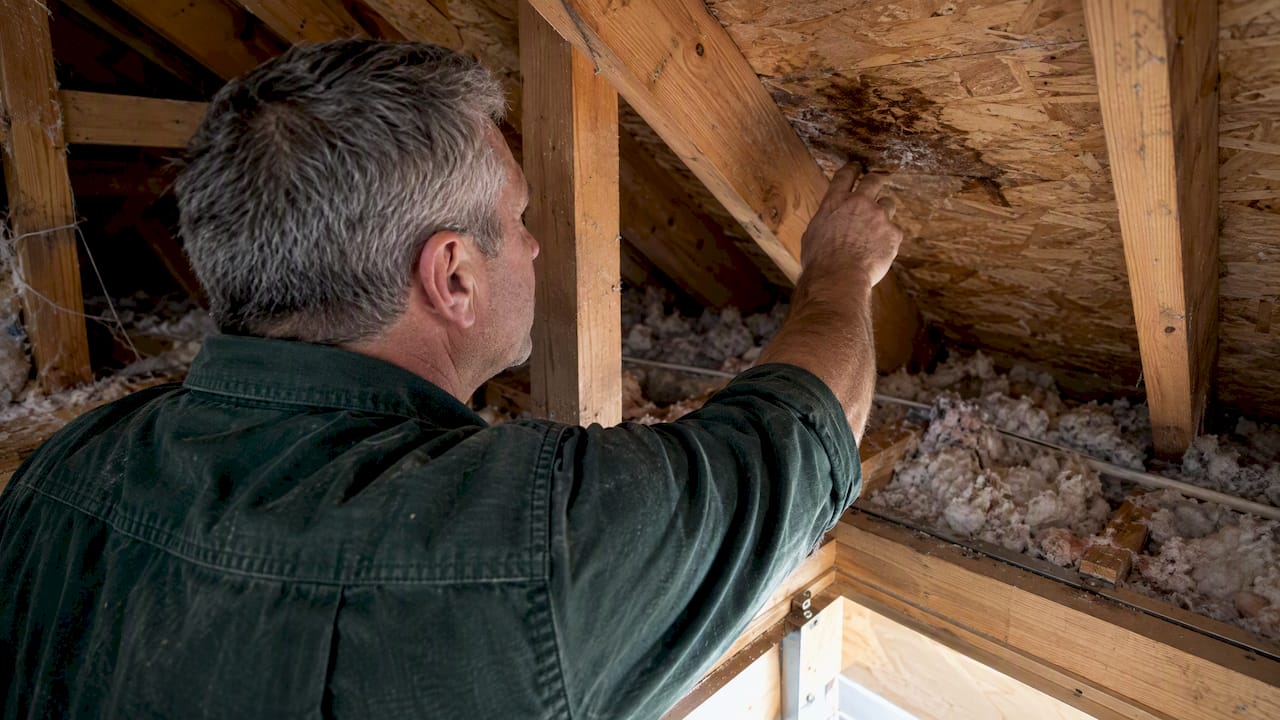
Common contractor fixes include re-securing molding into framing instead of drywall, replacing warped or split sections outright, switching to two-piece molding in rooms with persistent movement, and repairing any drywall or ceiling damage uncovered during the work. If the cracking traces back to a window or roof leak rather than simple seasonal movement, that is a different repair entirely, and our guide to water intrusion around windows walks through how to spot the difference. A contractor with licensed and insured crews can manage interior carpentry, drywall, and painting projects from consultation through final walkthrough as part of residential remodeling work.
Practical perspective: match the fix to your tolerance, not your fear
Seasonal cracks are a normal part of owning a house with wood trim, and most of them deserve a tube of caulk, not a remodel. I would caulk a hallway seam every other winter for years before I would gut a formal dining room's molding over a gap that closes back up by summer. The exception is a room where the look matters enough that you want it solved once, with two-piece molding or stud-fastened trim, even at a higher upfront cost. Before committing to that expense, watch the crack through one full season. Most of what looks alarming in February is gone, or at least predictable, by August.
— Noah
Spagnotti Contracting services for trim, drywall, and interior finishing
A caulk gun and an afternoon handle most seasonal molding cracks just fine. When the trim itself needs replacing, the drywall behind it is damaged, or you would rather have someone else manage the fastening and finish work, that is where a contractor earns the call.
Interior carpentry and trim repair for sections that need replacing or refastening into framing
Drywall repair for ceiling or wall damage uncovered behind cracked molding
Interior painting and finishing to match the repair seamlessly with the rest of the room
Interior carpentry, drywall, and painting services are available for homeowners with clear communication and project management from the first estimate through the final walkthrough. Request an on-site estimate through the residential services page to get a straight answer on what your trim actually needs.
Sources
When a ceiling crack needs a structural engineer vs a drywall repair | HouseWiseLab
Dimensional changes in wood | Oklahoma State University Extension
Wood and moisture relationships | Oregon State University Extension
Cracks in Crown Molding: Sign of Structural Damage? | The Money Pit
FAQ
My crown molding has gaps. How can I fix them?
Clean out any old caulk or debris, fill gaps wider than an eighth of an inch with paintable wood filler, then run a bead of acrylic-latex caulk along the seam and tool it smooth. Let it cure fully, usually 24 to 48 hours, before sanding lightly and painting to match.
What is the best filler to use for gaps in crown molding?
Acrylic-latex paintable caulk is the standard choice because it flexes with seasonal wood movement and holds paint without cracking, and some manufacturer sealants reference the ASTM C920 standard for flexibility and adhesion. Rigid wood filler or spackle works for static nail holes and chips but tends to crack if used on a seam that keeps moving.
Should you worry about ceiling cracks?
Most ceiling cracks near crown molding are cosmetic, caused by seasonal wood movement or truss uplift, and are typically not a structural concern. Watch for diagonal cracks near doors or windows, continuous cracks that run down the wall, or sudden appearance after a heavy load, and get an inspection if you see any of those patterns.
How can I repair cracked seams in crown molding?
Remove the old, cracked caulk down to clean wood and drywall, then refasten any loose molding into a stud or joist if that is the underlying cause. Apply a flexible paintable caulk in a thin, even bead, let it cure completely, and finish with a matching paint coat once it is dry.
Recommended
Dealing With Something Similar?
Every property is different, but if this sounds like what you’re seeing, we’re happy to take a look and help you figure out what’s actually going on.